更新说明:对文章目录排版做了调整。 更新时间:2022-05-04
第一章:本周导学
1-1 本周整体内容介绍和学习方法
重点:脚手架安装 项目/组件 功能开发。
技术栈:ejs模版渲染(项目模板安装)和glob文件筛选。
加餐:ejs源码解析、require源码解析。
第二章:脚手架安装模版功能架构设计
2-1 脚手架安装项目模板架构设计
2-2 脚手架组件初始化架构设计
与项目大体过程没有改变。
文本提示名称
项目名称format
组件需要填写描述信息
第三章 脚手架模板安装核心实现:ejs 库功能详解
3-1 ejs模板引擎的三种基本用法
ejs主要用于模版渲染的。jsp、php是之前模版渲染的代表。ejs的实现与jsp非常类似。
ejs.compile(html,options)(data)
1
2
3
4
5
6
7
8
9
10
11
12
13
14
15
16
17
18
19
20
21
22
23
24
25
const ejs = require ('ejs' )const path = require ('path' )const html ='<div><%= user.name%></div>' const options = {}const data ={ user :{ name :'liugezhou' } } const template = ejs.compile (html,options) const compileTemplate = template (data)console .log (compileTemplate) const renderTemplate = ejs.render (html,data,options)console .log (renderTemplate)const renderFile = ejs.renderFile (path.resolve (__dirname,'template.html' ),data,options)renderFile.then (file =>console .log (file))
3-2 ejs模板不同标签用法详解
<% : ‘脚本’标签,用于流程控制,无输出。
<%= : 输出数据到模版(输出是转义Html标签)
<%- : 输出非转义的数据到模版 :如果数据是liugehou
,那么输出的就是这样的格式。
<%# : 注释标签,不执行、不输出内容,但是会占空间。
<%_ : 删除前面空格空符
-%>: 删除紧随其后的换行符
_%>: 删除后面空格字符
3-3 ejs模板几种特殊用法
本节主要介绍ejs另外比较常用的三个辅助功能
包含: include
自定义分隔符: 我们上面默认使用的是%,我们只需要在options参数中定义 delimiter这个参数即可
自定义文件加载器: 在使用ejs.renderFile读取文件之前,可以使用ejs.fileLoader做一些操作
1 2 3 4 ejs.fileLoader = function (filePath ){ const content = fs.readFileSync (filePath) return '<div><%= user.copyright %></div>' + content }
3-4 glob用法小结
glob最早是出现在类Unix系统的命令中的,用来匹配文件路径。
1
2
3
4
5
const glob = require ('glob' )glob ('**/*.js' ,{ignore :['node_modules/**' ,'webpack.config.js' ]},function (err,file ){ console .log (file) })
第四章:脚手架项目模板安装功能开发
4-1 引入项目模板类型和标准安装逻辑开发
本节代码较少,主要是梳理流程,上一大周写到了下载模版到本地缓存,本节接着上周进度:
4-2 拷贝项目模板功能开发
1
2
3
4
5
6
7
8
9
10
11
12
13
14
15
16
17
18
19
async installNormalTemplate ( const spinner = spinnerStart ('正在安装模板...' ) await sleep () try { const templatePath = path.resolve (this .templateNpm .cacheFilePath ,'template' ) const targetPath = process.cwd () fse.ensureDirSync (templatePath) fse.ensureDirSync (targetPath) fse.copySync (templatePath,targetPath) } catch (error) { throw error } finally { spinner.stop (true ) log.success ('模板安装成功' ) } }
4-3 项目模板安装依赖和启动命令 | 4-4 白名单命令检测功能开发
在上一节,模板copy成功之后,紧接着:
1 2 3 4 5 6 const { installCommand,startCommand } = this .templateInfo await this .execCommand (installCommand,'依赖过程安装失败!' )await this .execCommand (startCommand,'启动命令执行失败失败!' )
1
2
3
4
5
6
7
8
9
10
11
12
13
14
15
16
17
18
19
20
21
22
23
24
25
26
27
const WHITE_COMMAND =['npm' , 'cnpm' ] async execCommand (command,errMsg ){ let ret if (command){ const cmdArray=command.split (' ' ) const cmd = this .checkCommand (cmdArray[0 ]) if (!cmd){ throw new Error (errMsg) } const args = cmdArray.slice (1 ) ret = await execAsync (cmd,args,{ stdio :'inherit' , cwd :process.cwd () }) if (ret !== 0 ){ throw new Error ('依赖安装过程失败' ) } return ret } } checkCommand (cmd ){ if (WHITE_COMMAND .includes (cmd)){ return cmd } return null ; }
4-5 项目名称自动格式化功能开发
本节使用了kebab-case这个库,将手动填入的项目名称保存在projectInfo中,以供后续package.json中的ejs渲染使用。
1 2 3 4 5 6 7 8 if (projectInfo.projectName ){ projectInfo.name = projectInfo.projectName projectInfo.className = require ('kebab-case' )(projectInfo.projectName ).replace (/^-/ ,'' ); } if (projectInfo.projectVersion ){ projectInfo.version = projectInfo.projectVersion }
4-6 本章核心:ejs动态渲染项目模板
首先将vue2模版中package.json文件中的name以及version使用<%= className%>和<%= version%>替代,并发布新的版本至npm。
commands/init模块安装 ejs和glob库。
核心代码如下(在4-4节中依赖安装前,ejs动态渲染)
1
2
3
4
5
6
7
8
9
10
11
12
13
14
15
16
17
18
19
20
21
22
23
24
25
26
27
28
29
30
31
async ejsRender (options ){ const dir = process.cwd () const projectInfo = this .projectInfo return new Promise ((resolve,reject )=> { glob ('**' ,{ cwd :dir, ignore :options.ignore || '' , nodir :true },(err,files ) => { if (err){ reject (err) } Promise .all (files.map (file => const filePath = path.join (dir,file) return new Promise ( (resolve1,reject1 ) => { ejs.renderFile ( filePath,projectInfo,{},(err,result ) => { if (err){ reject1 (err) } fse.writeFileSync (filePath,result) resolve1 (result) }) }) })).then (()=> { resolve () }).catch (err => reject (err) }) }) }) }
4-7 init命令直接传入项目名称功能支持
本节完成的是 对命令行中传入项目名称的一个支持
第五章 组件模板开发及脚手架组件初始化功能支持
5-1 慕课乐高组件库模板开发
维护组件库发布至npm,然后在mongodb数据库中进行配置。
5-2 项目和组件模板数据隔离+动态配置ejs ignore
这部分完整代码如下
1 2 3 4 5 6 7 8 9 10 11 12 13 14 15 16 17 18 19 20 21 22 23 24 25 26 27 28 29 30 31 32 33 34 35 36 37 38 39 40 41 42 43 44 45 46 47 48 49 50 51 52 53 54 55 56 57 58 59 60 61 62 63 64 65 66 67 68 69 70 71 const { type } = await inquirer.prompt ({ type :'list' , name :'type' , message :'请选择初始化类型' , default :TYPE_PROJECT , choices : [{ name : '项目' , value : TYPE_PROJECT , }, { name : '组件' , value : TYPE_COMPONENT , }] }) this .template = this .template .filter (template =>tag && template.tag .includes (type))const title = type === TYPE_PROJECT ? '项目' :'组件' const projectNamePrompt = { type :'input' , name :'projectName' , message :`请输入${title} 的名称` , default :'' , validate :function (v ){ const done = this .async () setTimeout (function ( if (!isValidName (v)){ done (`请输入合法的${title} 名称` ) return ; } done (null ,true ) }, 0 ); }, filter :function (v ){ return v } } const projectPrompt = []if (!isProjectNameValid) { projectPrompt.push (projectNamePrompt); } projectPrompt.push ({ type :'input' , name :'projectVersion' , default :'1.0.0' , message :`请输入${title} 版本号` , validate :function (v ){ const done = this .async (); setTimeout (function ( if (!(!!semver.valid (v))) { done (`请输入合法的${title} 版本号` ); return ; } done (null , true ); }, 0 ); }, filter :function (v ){ if (semver.valid (v)){ return semver.valid (v) } else { return v } }, },{ type :'list' , name :'projectTemplate' , message :`请选择${title} 模板` , choices : this .createTemplateChoice () })
5-3 获取组件信息功能开发
完整核心代码如下,添加了 descriptionPrompt
1
2
3
4
5
6
7
8
9
10
11
12
13
14
15
16
17
18
19
20
21
22
23
24
25
26
27
28
29
30
31
32
else if (type === TYPE_COMPONENT ){ const descriptionPrompt = { type :'input' , name :'componentDescription' , message :'请输入组件描述信息' , default :'' , validate :function (v ){ const done = this .async () setTimeout (() => { if (!v){ done ('请输入组件描述信息' ) return } done (null ,true ) }, 0 ); } } projectPrompt.push (descriptionPrompt) const component = await inquirer.prompt (projectPrompt) projectInfo = { ...projectInfo, type, ...component } } …… if (projectInfo.componentDescription ){ projectInfo.description = projectInfo.componentDescription }
5-4 解决组件库初始化过程中各种工程问题
慕课乐高组件库,在发布到npm包时,安装出现问题,问题原因是 package.json中,需要将
第六章 脚手架自定义初始化项目模板功能开发
6-1 自定义项目模板开发
6-2 自定义模板执行逻辑开发 6-3 自定义模板上线
1
2
3
4
5
6
7
8
9
10
11
12
13
14
15
16
17
18
19
20
21
async installCustomTemplate ( if (await this .templateNpm .exists ()){ const rootFile = this .templateNpm .getRootFilePath () if (fs.existsSync (rootFile)){ log.verbose ('开始执行自定义模板' ) const templatePath = path.resolve (this .templateNpm .cacheFilePath , 'template' ); const options = { templateInfo : this .templateInfo , projectInfo : this .projectInfo , sourcePath : templatePath, targetPath : process.cwd (), }; const code = `require('${rootFile} ')(${JSON .stringify(options)} )` await execAsync ('node' , ['-e' , code], {stdio :'inherit' ,cwd : process.cwd ()}) log.success ('自定义模版安装成功' ) }else { throw new Error ('自定义模板入口文件不存在' ) } } }
第七章 本周加餐:ejs 库源码解析 —— 彻底搞懂模板动态渲染原理
7-1 ejs.compile执行流程分析
ejs模版渲染的思路值得我们学习,于是我们就开始了了ejs的源码的学习。
点击查看【processon】
本节内容较简单,我们打开webstore,从下面的代码开始调试(11行 打断点)
1
2
3
4
5
6
7
8
9
10
11
12
const ejs = require ('ejs' )const html = '<div><%= user.name %></div>' const options = {}const data = { user :{ name :'liugezhou' } } const template = ejs.compile (html,options)const compiletemplate = template (data)
1 2 3 4 5 6 7 8 9 exports .compile = function compile (template, opts ) { var templ; if (opts && opts.scope ) { …… } templ = new Template (template, opts); return templ.compile (); };
templ = new Template(template,opts) 我们继续进去源码,重要的有两点
this.templateText = text
this.regex = this.createRegex()
下节开始 templ.compile()
1
2
3
4
5
6
7
8
9
10
11
12
13
14
15
16
17
18
19
20
21
22
23
24
25
26
27
28
29
30
31
32
33
34
35
36
37
38
39
40
41
function Template (text, opts ) { opts = opts || {}; var options = {}; this .templateText = text; this .mode = null ; this .truncate = false ; this .currentLine = 1 ; this .source = '' ; options.client = opts.client || false ; options.escapeFunction = opts.escape || opts.escapeFunction || utils.escapeXML ; options.compileDebug = opts.compileDebug !== false ; options.debug = !!opts.debug ; options.filename = opts.filename ; options.openDelimiter = opts.openDelimiter || exports .openDelimiter || _DEFAULT_OPEN_DELIMITER; options.closeDelimiter = opts.closeDelimiter || exports .closeDelimiter || _DEFAULT_CLOSE_DELIMITER; options.delimiter = opts.delimiter || exports .delimiter || _DEFAULT_DELIMITER; options.strict = opts.strict || false ; options.context = opts.context ; options.cache = opts.cache || false ; options.rmWhitespace = opts.rmWhitespace ; options.root = opts.root ; options.includer = opts.includer ; options.outputFunctionName = opts.outputFunctionName ; options.localsName = opts.localsName || exports .localsName || _DEFAULT_LOCALS_NAME; options.views = opts.views ; options.async = opts.async ; options.destructuredLocals = opts.destructuredLocals ; options.legacyInclude = typeof opts.legacyInclude != 'undefined' ? !!opts.legacyInclude : true ; if (options.strict ) { options._with = false ; } else { options._with = typeof opts._with != 'undefined' ? opts._with : true ; } this .opts = options; this .regex = this .createRegex (); }
7-2 深入讲解ejs编译原理
上一节我们看到了 return templet.compile()处,源代码如下
1
2
3
4
5
6
7
8
9
10
11
12
13
14
15
16
17
18
19
20
21
22
23
24
25
26
27
28
29
30
31
32
33
34
35
36
37
38
39
40
41
42
43
44
45
46
47
48
49
50
51
52
53
54
55
56
57
58
59
60
61
62
63
64
65
66
67
68
69
70
71
72
73
74
75
76
77
78
79
80
81
82
83
84
85
86
87
88
89
90
91
92
93
94
95
96
97
98
99
100
101
102
103
104
105
106
107
108
109
110
111
112
113
114
115
116
117
118
119
120
121
122
123
124
125
126
127
128
129
130
131
compile : function ( var src; var fn; var opts = this .opts ; var prepended = '' ; var appended = '' ; var escapeFn = opts.escapeFunction ; var ctor; var sanitizedFilename = opts.filename ? JSON .stringify (opts.filename ) : 'undefined' ; if (!this .source ) { this .generateSource (); prepended += ' var __output = "";\n' + ' function __append(s) { if (s !== undefined && s !== null) __output += s }\n' ; if (opts.outputFunctionName ) { prepended += ' var ' + opts.outputFunctionName + ' = __append;' + '\n' ; } if (opts.destructuredLocals && opts.destructuredLocals .length ) { var destructuring = ' var __locals = (' + opts.localsName + ' || {}),\n' ; for (var i = 0 ; i < opts.destructuredLocals .length ; i++) { var name = opts.destructuredLocals [i]; if (i > 0 ) { destructuring += ',\n ' ; } destructuring += name + ' = __locals.' + name; } prepended += destructuring + ';\n' ; } if (opts._with !== false ) { prepended += ' with (' + opts.localsName + ' || {}) {' + '\n' ; appended += ' }' + '\n' ; } appended += ' return __output;' + '\n' ; this .source = prepended + this .source + appended; } if (opts.compileDebug ) { src = 'var __line = 1' + '\n' + ' , __lines = ' + JSON .stringify (this .templateText ) + '\n' + ' , __filename = ' + sanitizedFilename + ';' + '\n' + 'try {' + '\n' + this .source + '} catch (e) {' + '\n' + ' rethrow(e, __lines, __filename, __line, escapeFn);' + '\n' + '}' + '\n' ; } else { src = this .source ; } if (opts.client ) { src = 'escapeFn = escapeFn || ' + escapeFn.toString () + ';' + '\n' + src; if (opts.compileDebug ) { src = 'rethrow = rethrow || ' + rethrow.toString () + ';' + '\n' + src; } } if (opts.strict ) { src = '"use strict";\n' + src; } if (opts.debug ) { console .log (src); } if (opts.compileDebug && opts.filename ) { src = src + '\n' + '//# sourceURL=' + sanitizedFilename + '\n' ; } try { if (opts.async ) { try { ctor = (new Function ('return (async function(){}).constructor;' ))(); } catch (e) { if (e instanceof SyntaxError ) { throw new Error ('This environment does not support async/await' ); } else { throw e; } } } else { ctor = Function ; } fn = new ctor (opts.localsName + ', escapeFn, include, rethrow' , src); } catch (e) { if (e instanceof SyntaxError ) { if (opts.filename ) { e.message += ' in ' + opts.filename ; } e.message += ' while compiling ejs\n\n' ; e.message += 'If the above error is not helpful, you may want to try EJS-Lint:\n' ; e.message += 'https://github.com/RyanZim/EJS-Lint' ; if (!opts.async ) { e.message += '\n' ; e.message += 'Or, if you meant to create an async function, pass `async: true` as an option.' ; } } throw e; } var returnedFn = opts.client ? fn : function anonymous (data ) { var include = function (path, includeData ) { var d = utils.shallowCopy ({}, data); if (includeData) { d = utils.shallowCopy (d, includeData); } return includeFile (path, opts)(d); }; return fn.apply (opts.context , [data || {}, escapeFn, include, rethrow]); }; if (opts.filename && typeof Object .defineProperty === 'function' ) { var filename = opts.filename ; var basename = path.basename (filename, path.extname (filename)); try { Object .defineProperty (returnedFn, 'name' , { value : basename, writable : false , enumerable : false , configurable : true }); } catch (e) {} } return returnedFn; },
generateSource:(最终拿到结果this.source)
1
2
3
4
5
6
7
8
9
10
11
12
13
14
15
16
17
18
19
20
21
22
23
24
25
26
27
28
29
30
generateSource : function ( var opts = this .opts ; this .templateText = this .templateText .replace (/[ \t]*<%_/gm , '<%_' ).replace (/_%>[ \t]*/gm , '_%>' ); var self = this ; var matches = this .parseTemplateText (); var d = this .opts .delimiter ; var o = this .opts .openDelimiter ; var c = this .opts .closeDelimiter ; if (matches && matches.length ) { matches.forEach (function (line, index ) { var closing; if ( line.indexOf (o + d) === 0 && line.indexOf (o + d + d) !== 0 ) { closing = matches[index + 2 ]; if (!(closing == d + c || closing == '-' + d + c || closing == '_' + d + c)) { throw new Error ('Could not find matching close tag for "' + line + '".' ); } } self.scanLine (line); }); } },
7-3 动态生成Function+with用法讲解
上一节代码没有继续追踪,根据自己的源码一步一步调试,生一节调试到的代码为:
1 2 fn = new ctor (opts.localsName + ', escapeFn, include, rethrow' , src);
代码讲解:
我们回到7-1节中基础代码,在optons加入参数debug为true,控制台输出内容为:
1
2
3
4
5
6
7
8
9
10
11
12
13
14
15
16
var __line = 1 , __lines = "<div><%= user.name%></div>" , __filename = undefined ; try { var __output = "" ; function __append (s ) { if (s !== undefined && s !== null ) __output += s } with (locals || {}) { ; __append ("<div>" ) ; __append (escapeFn( user.name )) ; __append ("</div>" ) } return __output; } catch (e) { rethrow (e, __lines, __filename, __line, escapeFn); }
通过代码,我们看到了‘with’,现在前端with的使用已经很不常见且不推荐使用了,这里简单了解下:
1
2
3
4
5
6
7
8
9
const ctx = { user :{ name :'liugezhou' } } with (ctx ){ console .log (user.name ) }
7-4 ejs compile函数执行流程分析
apply简要解释
1
2
3
4
5
6
7
8
function test (a,b,c ){ console .log (a,b,c) console .log (this .a ) } test (1 ,2 ,3 ) test.apply ({a :'applt' },[2 ,3 ,4 ]) test.call ({a :'call' ,2 ,3 ,4 )
7-5 ejs.render和renderFile原理讲解
ejs.render的代码执行流程为:
const renderTemplate = ejs.render(html,data,options)
exports.render ==> handleCache(opts, template)
handleCache ==> return exports.compile(template, options);
handleCache(opts, template)(data)
renderFile的原理讲解
const renderFile = ejs.renderFile(path .resolve(__dirname,‘template.html’),data,options)
exports.renderFile
tryHandleCache(opts, data, cb)
handleCache(options)(data)
第八章 加餐:require源码解析,彻底搞懂 npm 模块加载原理
8-1 require源码执行流程分析
**
加载模块类型
加载内置模块: require(‘fs’)
加载node_modules模块:require(‘ejs’)
加载本地模块:require(‘./utils’)
支持加载文件
我们在调试这行代码的时候,在执行栈中可以看到,之前也执行了很多代码,这里的流程以及上面分析的使用场景,我们可以先引出一些思考:
CommonJS模块的加载流程
require如何加载内置模块? loadNativeModule
require如何加载node_modules模块?
require为什么会将非js/json/node文件视为js进行加载
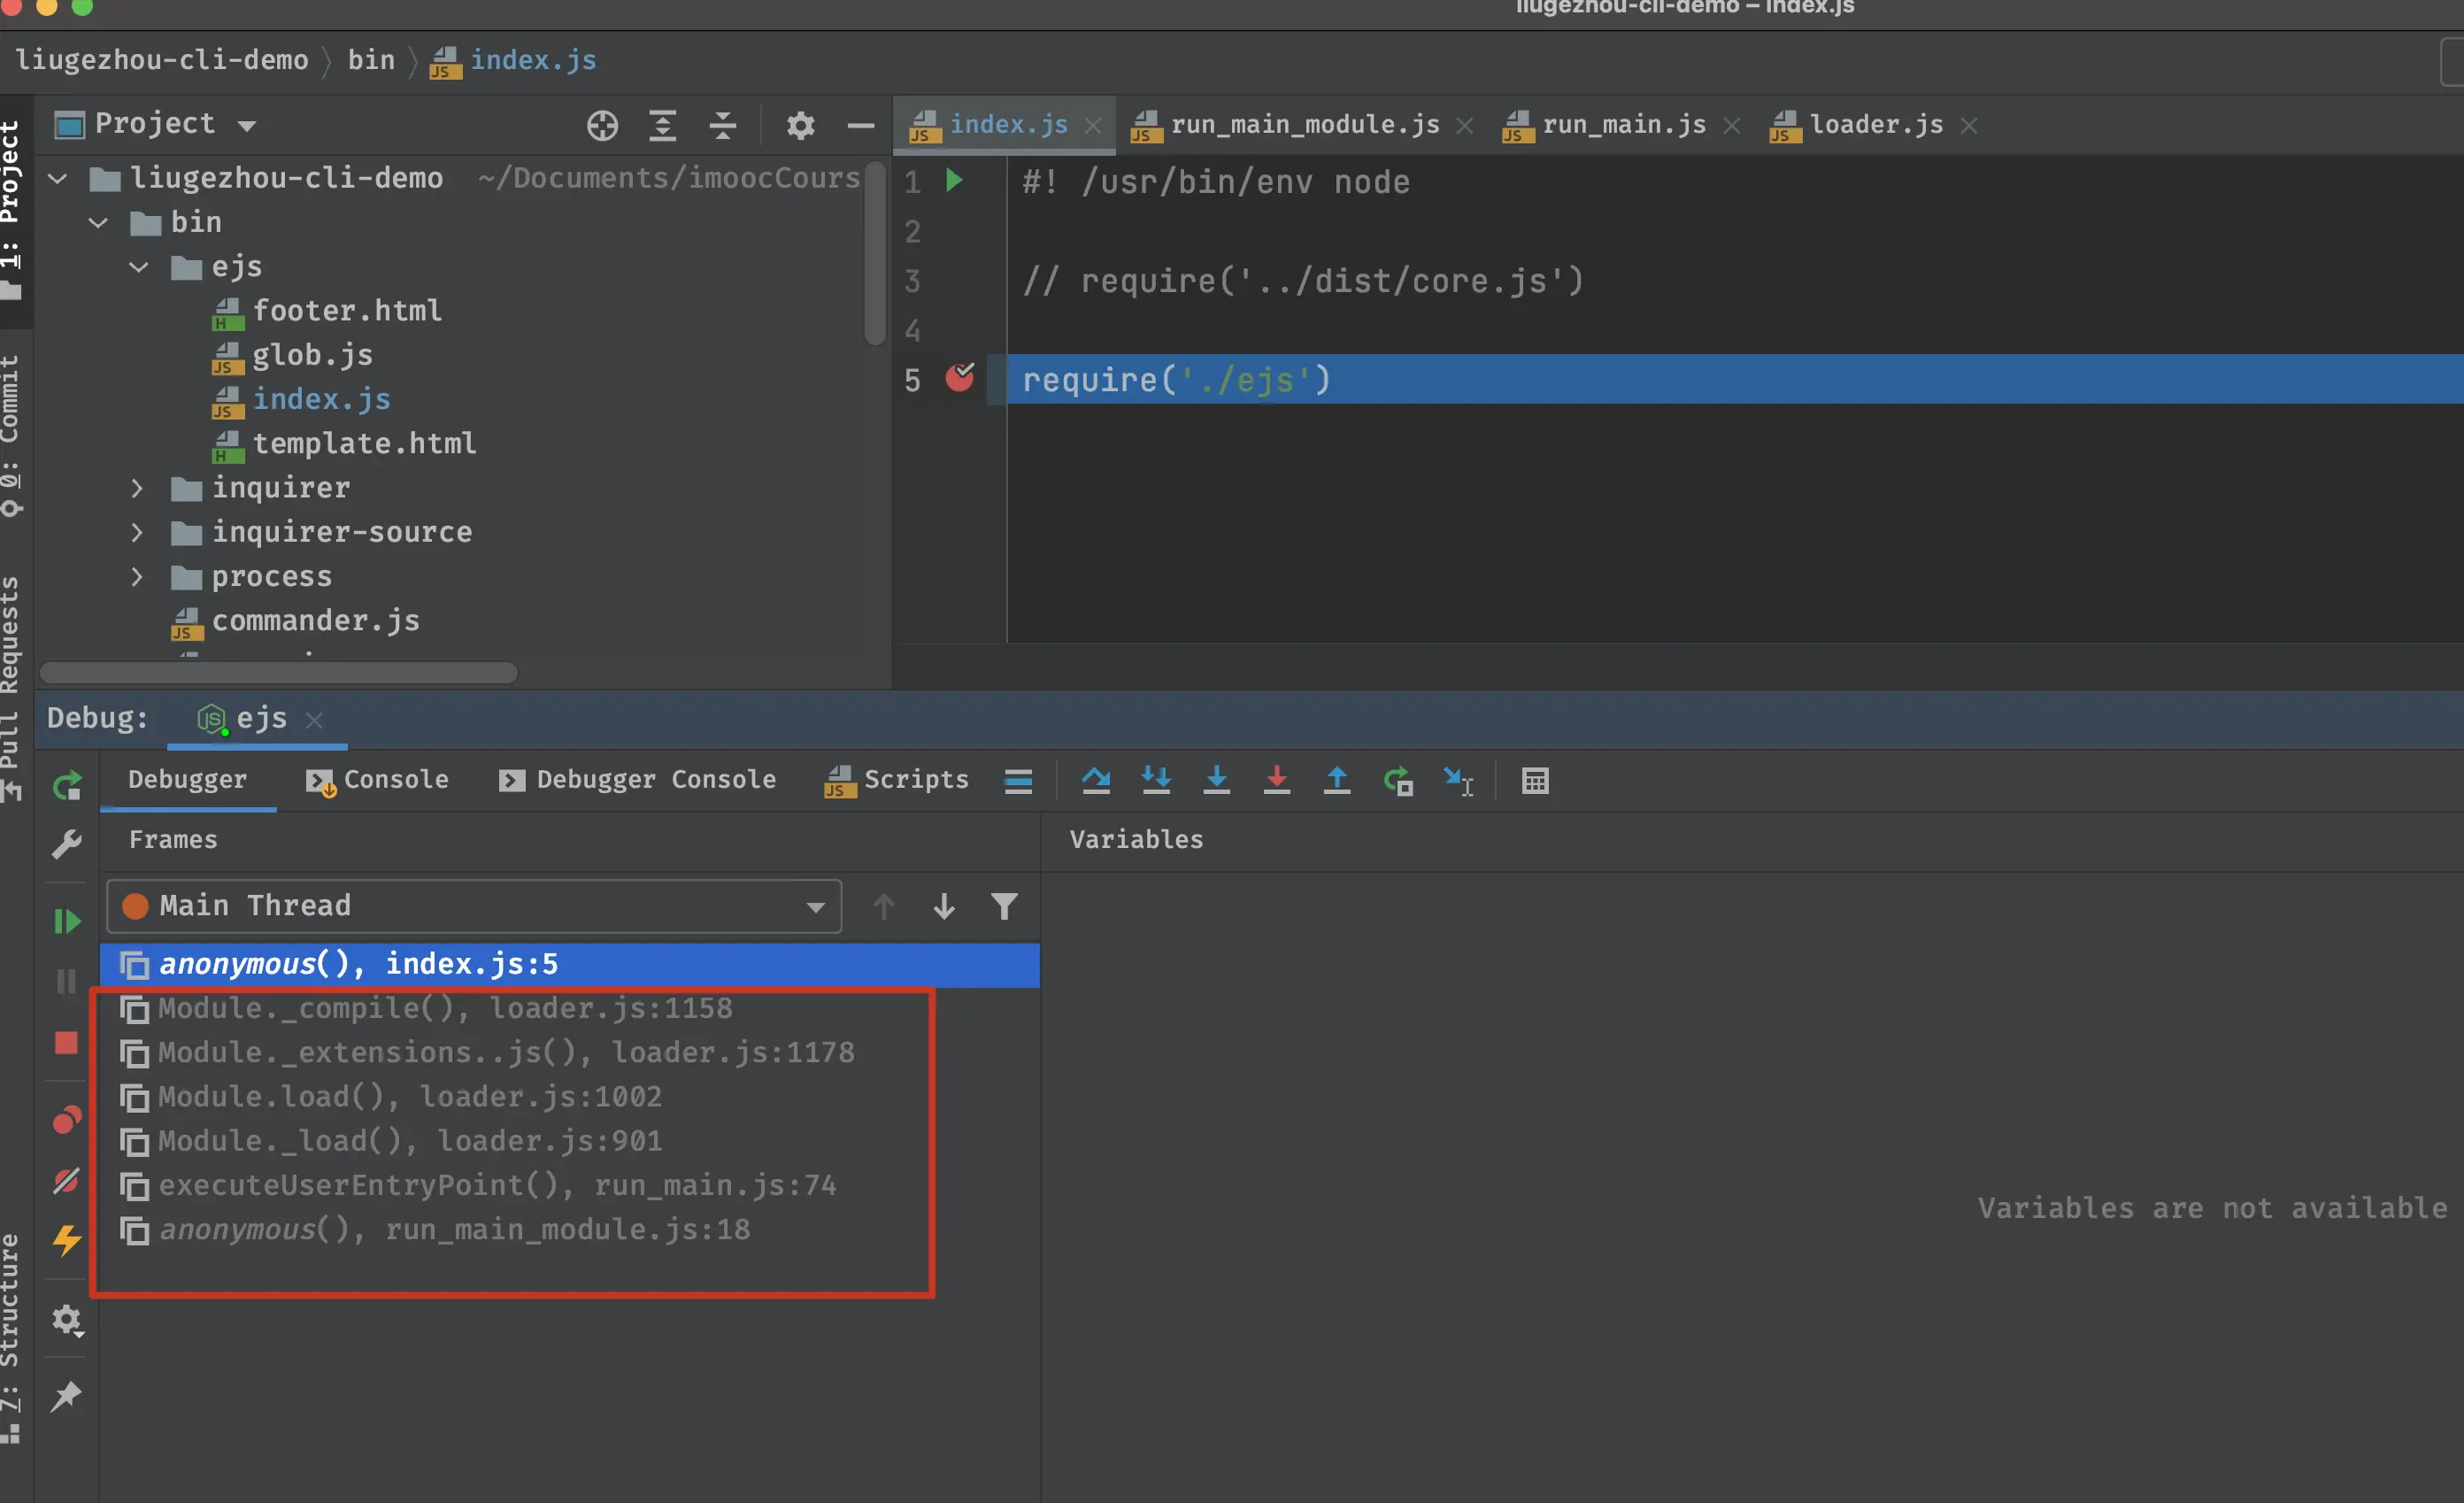
我们从 require(‘./ejs’) 这行代码在webStorm中开始调试。(点击step into )
打开 Scripts --> no domain --> internal --> modules --> cjs --> helpers.js
return mod.require(path); ----> line of 77 [helpers.js]
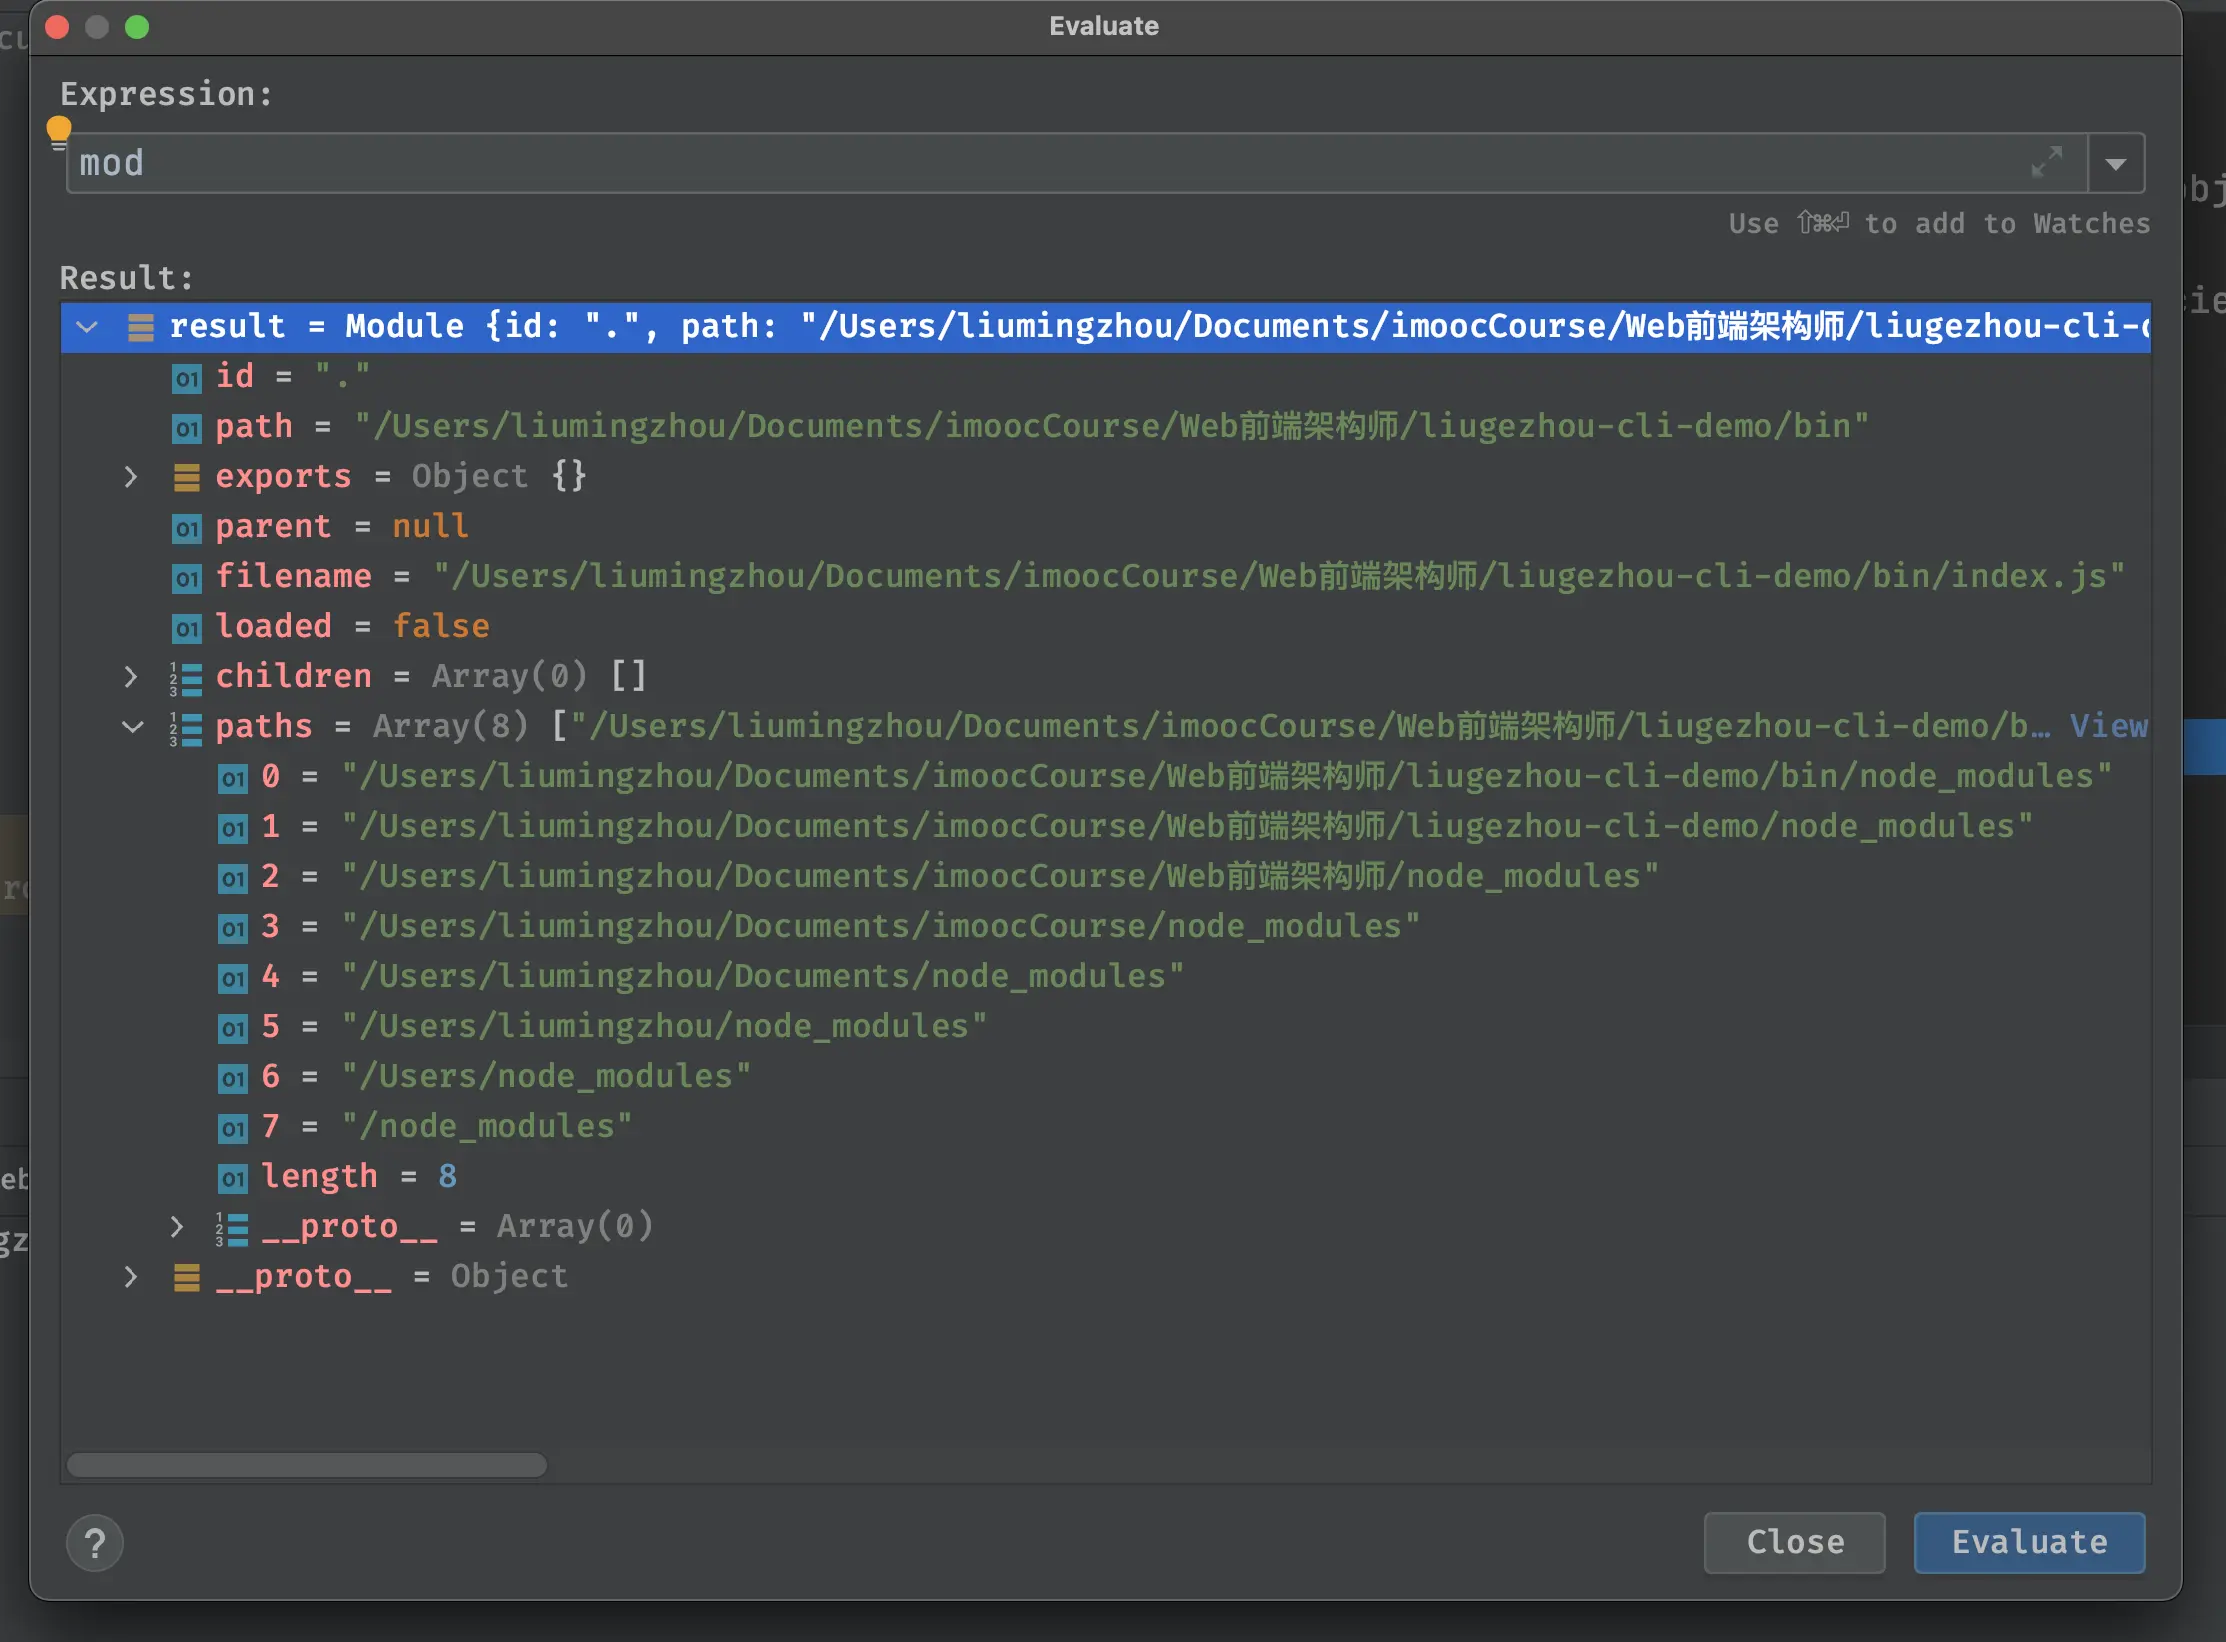
这里的mod就是指Module对象,调试后每个字段含义为:
id:源码文件路径
path:源码文件对应的文件夹,通过path.dirname(id)生成
exports:模块输出的内容,默认为{}
parent:父模块信息
filename:源码文件路径
loaded:是否已经加载完毕
children:子模块对象集合
paths:模块查询范围
继续step into到下一步,进去Module对象的require方法
代码如下: (校验参数为 string类型且不为空)
1
2
3
4
5
6
7
8
9
10
11
12
13
14
Module .prototype require = function (id ) { validateString (id, 'id' ); if (id === '' ) { throw new ERR_INVALID_ARG_VALUE ('id' , id, 'must be a non-empty string' ); } requireDepth++; try { return Module ._load (id, this , false ); } finally { requireDepth--; } };
Module._load(id,this,false) :
id:传入的字符串
this:Module对象
isMain:flase表示加载的不是一个主模块
1
2
3
4
5
6
7
8
9
10
11
12
13
14
15
16
17
18
19
20
21
22
23
24
25
26
27
28
29
30
31
32
33
34
35
36
37
38
39
40
41
42
43
44
45
46
47
48
49
50
51
52
53
54
55
56
57
58
59
60
61
62
63
64
65
66
67
68
69
70
Module ._load = function (request, parent, isMain ) { let relResolveCacheIdentifier; if (parent) { debug ('Module._load REQUEST %s parent: %s' , request, parent.id ); relResolveCacheIdentifier = `${parent.path} \x00${request} ` ; const filename = relativeResolveCache[relResolveCacheIdentifier]; if (filename !== undefined ) { const cachedModule = Module ._cache [filename]; if (cachedModule !== undefined ) { updateChildren (parent, cachedModule, true ); return cachedModule.exports ; } delete relativeResolveCache[relResolveCacheIdentifier]; } } const filename = Module ._resolveFilename (request, parent, isMain); const cachedModule = Module ._cache [filename]; if (cachedModule !== undefined ) { updateChildren (parent, cachedModule, true ); return cachedModule.exports ; } const mod = loadNativeModule (filename, request, experimentalModules); if (mod && mod.canBeRequiredByUsers ) return mod.exports ; const module = new Module (filename, parent); if (isMain) { process.mainModule = module ; module .id = '.' ; } Module ._cache [filename] = module ; if (parent !== undefined ) { relativeResolveCache[relResolveCacheIdentifier] = filename; } let threw = true ; try { if (enableSourceMaps) { try { module .load (filename); } catch (err) { rekeySourceMap (Module ._cache [filename], err); throw err; } } else { module .load (filename); } threw = false ; } finally { if (threw) { delete Module ._cache [filename]; if (parent !== undefined ) { delete relativeResolveCache[relResolveCacheIdentifier]; } } } return module .exports ; };
8-2 require加载模块原理详解
上一节我们走到了Module._load(filename)
1
2
3
4
5
6
7
8
9
10
11
12
13
14
15
16
17
18
19
20
21
22
23
24
25
26
27
28
29
30
31
32
33
34
35
36
37
38
39
40
41
42
43
44
45
46
47
48
49
Module .prototype load = function (filename ) { debug ('load %j for module %j' , filename, this .id ); assert (!this .loaded ); this .filename = filename; this .paths = Module ._nodeModulePaths (path.dirname (filename)); const extension = findLongestRegisteredExtension (filename); if (filename.endsWith ('.mjs' ) && !Module ._extensions ['.mjs' ]) { throw new ERR_REQUIRE_ESM (filename); } Module ._extensions [extension](this , filename); this .loaded = true ; if (experimentalModules) { const ESMLoader = asyncESM.ESMLoader ; const url = `${pathToFileURL(filename)} ` ; const module = ESMLoader .moduleMap .get (url); const exports = this .exports ; if (module !== undefined && module .module !== undefined ) { if (module .module .getStatus () >= kInstantiated) module .module .setExport ('default' , exports ); } else { ESMLoader .moduleMap .set ( url, () => new ModuleJob (ESMLoader , url, () => new ModuleWrap (url, undefined , ['default' ], function ( this .setExport ('default' , exports ); }) , false , false ) ); } } };
Module._extensionsextension
1
2
3
4
5
6
7
8
9
10
11
12
13
14
15
16
17
Module ._extensions ['.js' ] = function (module , filename if (filename.endsWith ('.js' )) { const pkg = readPackageScope (filename); if (pkg && pkg.data && pkg.data .type === 'module' ) { const parentPath = module .parent && module .parent .filename ; const packageJsonPath = path.resolve (pkg.path , 'package.json' ); throw new ERR_REQUIRE_ESM (filename, parentPath, packageJsonPath); } } const content = fs.readFileSync (filename, 'utf8' ); module ._compile (content, filename); };
1
2
3
4
5
6
7
8
9
10
11
12
13
14
15
16
17
18
19
20
21
22
23
24
25
26
27
28
29
30
31
32
33
34
35
36
37
38
39
40
41
42
43
44
45
46
47
48
49
50
51
52
53
54
Module .prototype _compile = function (content, filename ) { let moduleURL; let redirects; if (manifest) { moduleURL = pathToFileURL (filename); redirects = manifest.getRedirector (moduleURL); manifest.assertIntegrity (moduleURL, content); } maybeCacheSourceMap (filename, content, this ); const compiledWrapper = wrapSafe (filename, content, this ); var inspectorWrapper = null ; if (getOptionValue ('--inspect-brk' ) && process._eval == null ) { if (!resolvedArgv) { if (process.argv [1 ]) { try { resolvedArgv = Module ._resolveFilename (process.argv [1 ], null , false ); } catch { assert (ArrayIsArray (getOptionValue ('--require' ))); } } else { resolvedArgv = 'repl' ; } } if (resolvedArgv && !hasPausedEntry && filename === resolvedArgv) { hasPausedEntry = true ; inspectorWrapper = internalBinding ('inspector' ).callAndPauseOnStart ; } } const dirname = path.dirname (filename); const require = makeRequireFunction (this , redirects); let result; const exports = this .exports ; const thisValue = exports ; const module = this ; if (requireDepth === 0 ) statCache = new Map (); if (inspectorWrapper) { result = inspectorWrapper (compiledWrapper, thisValue, exports , require , module , filename, dirname); } else { result = compiledWrapper.call (thisValue, exports , require , module , filename, dirname); } hasLoadedAnyUserCJSModule = true ; if (requireDepth === 0 ) statCache = null ; return result; };
8-3 require加载内置模块和四种文件类型原理
加载内置模块:流程到 loadNativeModule结束。
加载node_modules模块:通过 Module._resolveFilename(request, parent, isMain)找到路径。
加载不存在模块:Module._resolveFilename中抛出异常。
加载.js/.json/.node/mjs文件:Module._extensions[‘XXX’ ]
加载其它文件后缀名:默认按js执行
8-4 require缓存机制解析和CommonJS加载主模块原理
连续加载两次同一个文件,require是如何处理的?
CommonJS加载主模块流程:
require(‘internal/modules/cjs/loader’).Module.runMain(process.argv[1]);
Module._load(main, null, true);
module.load(filename);
Module._extensions[extension](this, filename);
module._compile(content, filename);
与require的区别为:isMain为true,parent为null
8-5 require原理总结和回顾
relativeResolveCache[relResolveCacheIdentifier] 查询缓存路径Module._cache[filename] 查询缓存模块Module._resolveFilename 查询模块的真实路径Module._resolveFilename 查询模块的真实路径new Module 实例化 Module 对象module.load(filename) 加载模块findLongestRegisteredExtension 获取文件后缀Module._extensions[extension](this, filename) 解析模块并执行模块module._compile 编译模块代码compileFunction 将模块代码生成可执行函数exports, require, module, filename, dirname 生成入参compiledWrapper.call 执行模块函数return module.exports 输出模块返回结果