更新说明:对文章目录排版做了调整。 更新时间:2022-05-04
本Week代码提交支:lesson04
第一章:本周导学
1-1 本周整体内容介绍和学习方法
标题
基于Commander完成脚手架命令注册和命令执行过程开发
收获
如何设计高性能脚手架
Node多线程开发
javascript面向对象编程的实战技巧
内容
图解高性能脚手架架构设计方法
封装通用的Package和Command类
基于缓存 + Node 多进程 实现动态命令加载和执行
将业务逻辑和脚手架逻辑彻底解耦
加餐
Node多进程开发进阶–child_process源码解析
深入Node源码看清spawn/exec/execFile/fork的本质区别,彻底搞懂Node多进程原理。
第二章:imooc-cli脚手架命令注册
2-1 imooc-cli脚手架初始化+全局参数注册
本节的主要内容为使用commander这个库在全局添加注册命令
cd core/cli
npm i -S commander
1 2 3 4 5 6 7 8 9 10 11 12 13 14 15 16 17 18 19 20 21 22 23 24 25 26 27 28 29 30 31 32 33 34 35 function registerCommand ( program .name (Object .keys (pkg.bin )[0 ]) .usage ('<command> [options]' ) .version (pkg.version ) .option ('-d, --debug' , '是否开启调试模式' , false ); program.on ('option:debug' ,function ( if (program.opts ().debug ){ process.env .LOG_LEVEL ='verbose' }else { process.env .LOG_LEVEL ='info' } log.level = process.env .LOG_LEVEL }) program.on ('command:*' ,function (obj ){ const availableCommands = program.commands .map (cmd =>name ()) console .log (colors.red ('未知的命令:' +obj[0 ])) if (availableCommands.length > 0 ){ console .log (colors.red ('可用命令为:' +availableCommands.join (',' ))) } }) program.parse (program.argv ) if (program.args && program.args .length < 1 ) { program.outputHelp (); console .log () } }
2-2 imooc-cli脚手架命令注册
(本节有代码编写)
本节的主要内容为添加第一个comman操作:‘init ’,并在commands文件夹下创建新的init包
1 2 3 4 5 6 7 8 9 10 11 12 13 ...... const init = require ('@cloudscope-cli/init' )...... program .command ('init [projectName]' ) .option ('-f,--force' ,'是否强制更新项目' ) .action (init) ......
第三章:高性能脚手架架构设计和缓存结构设计
3-1 当前imooc-cli脚手架架构痛点分析
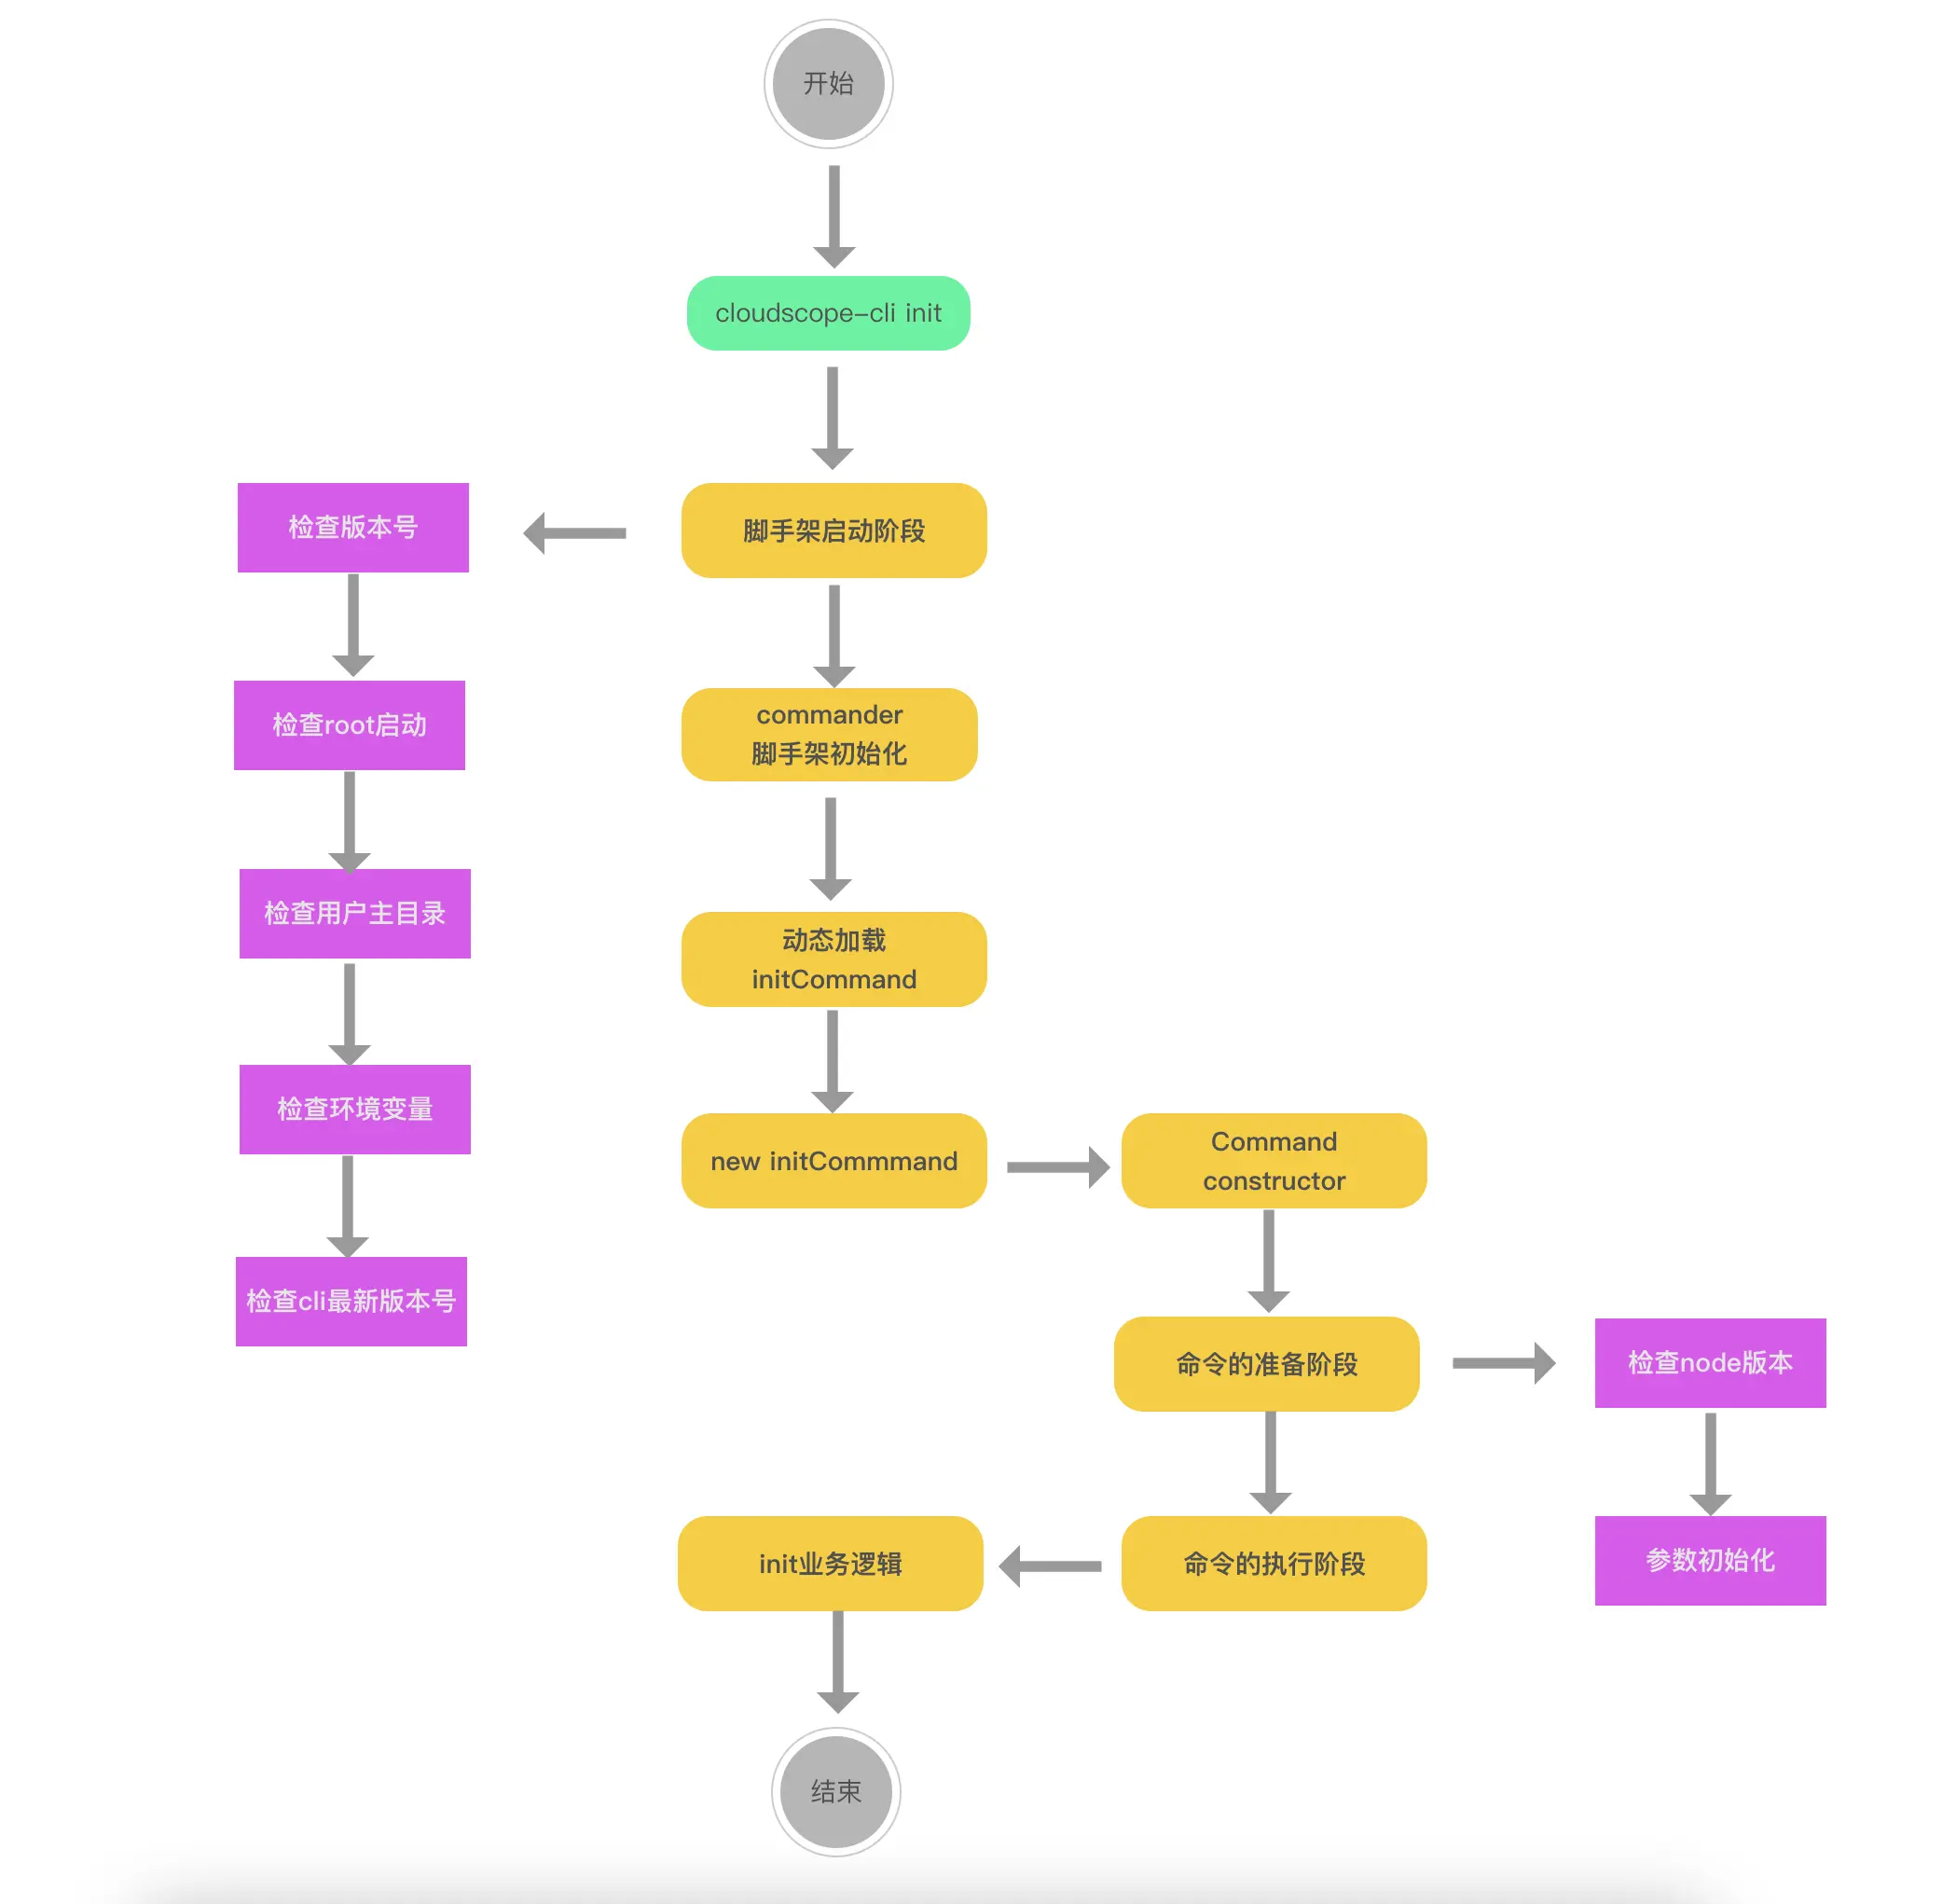
当前的代码架构如图:3-2 高性能脚手架架构设计
(本节无代码编写)
对以上架构(之前代码编写)的主要优化点有以下三个方面
将init命令做成了一个动态加载的形式
动态加载的脚手架通过缓存形式进行存储:执行哪个命令下载哪个命令
动态加载的时候,通过node多进程进行执行:深挖cpu性能
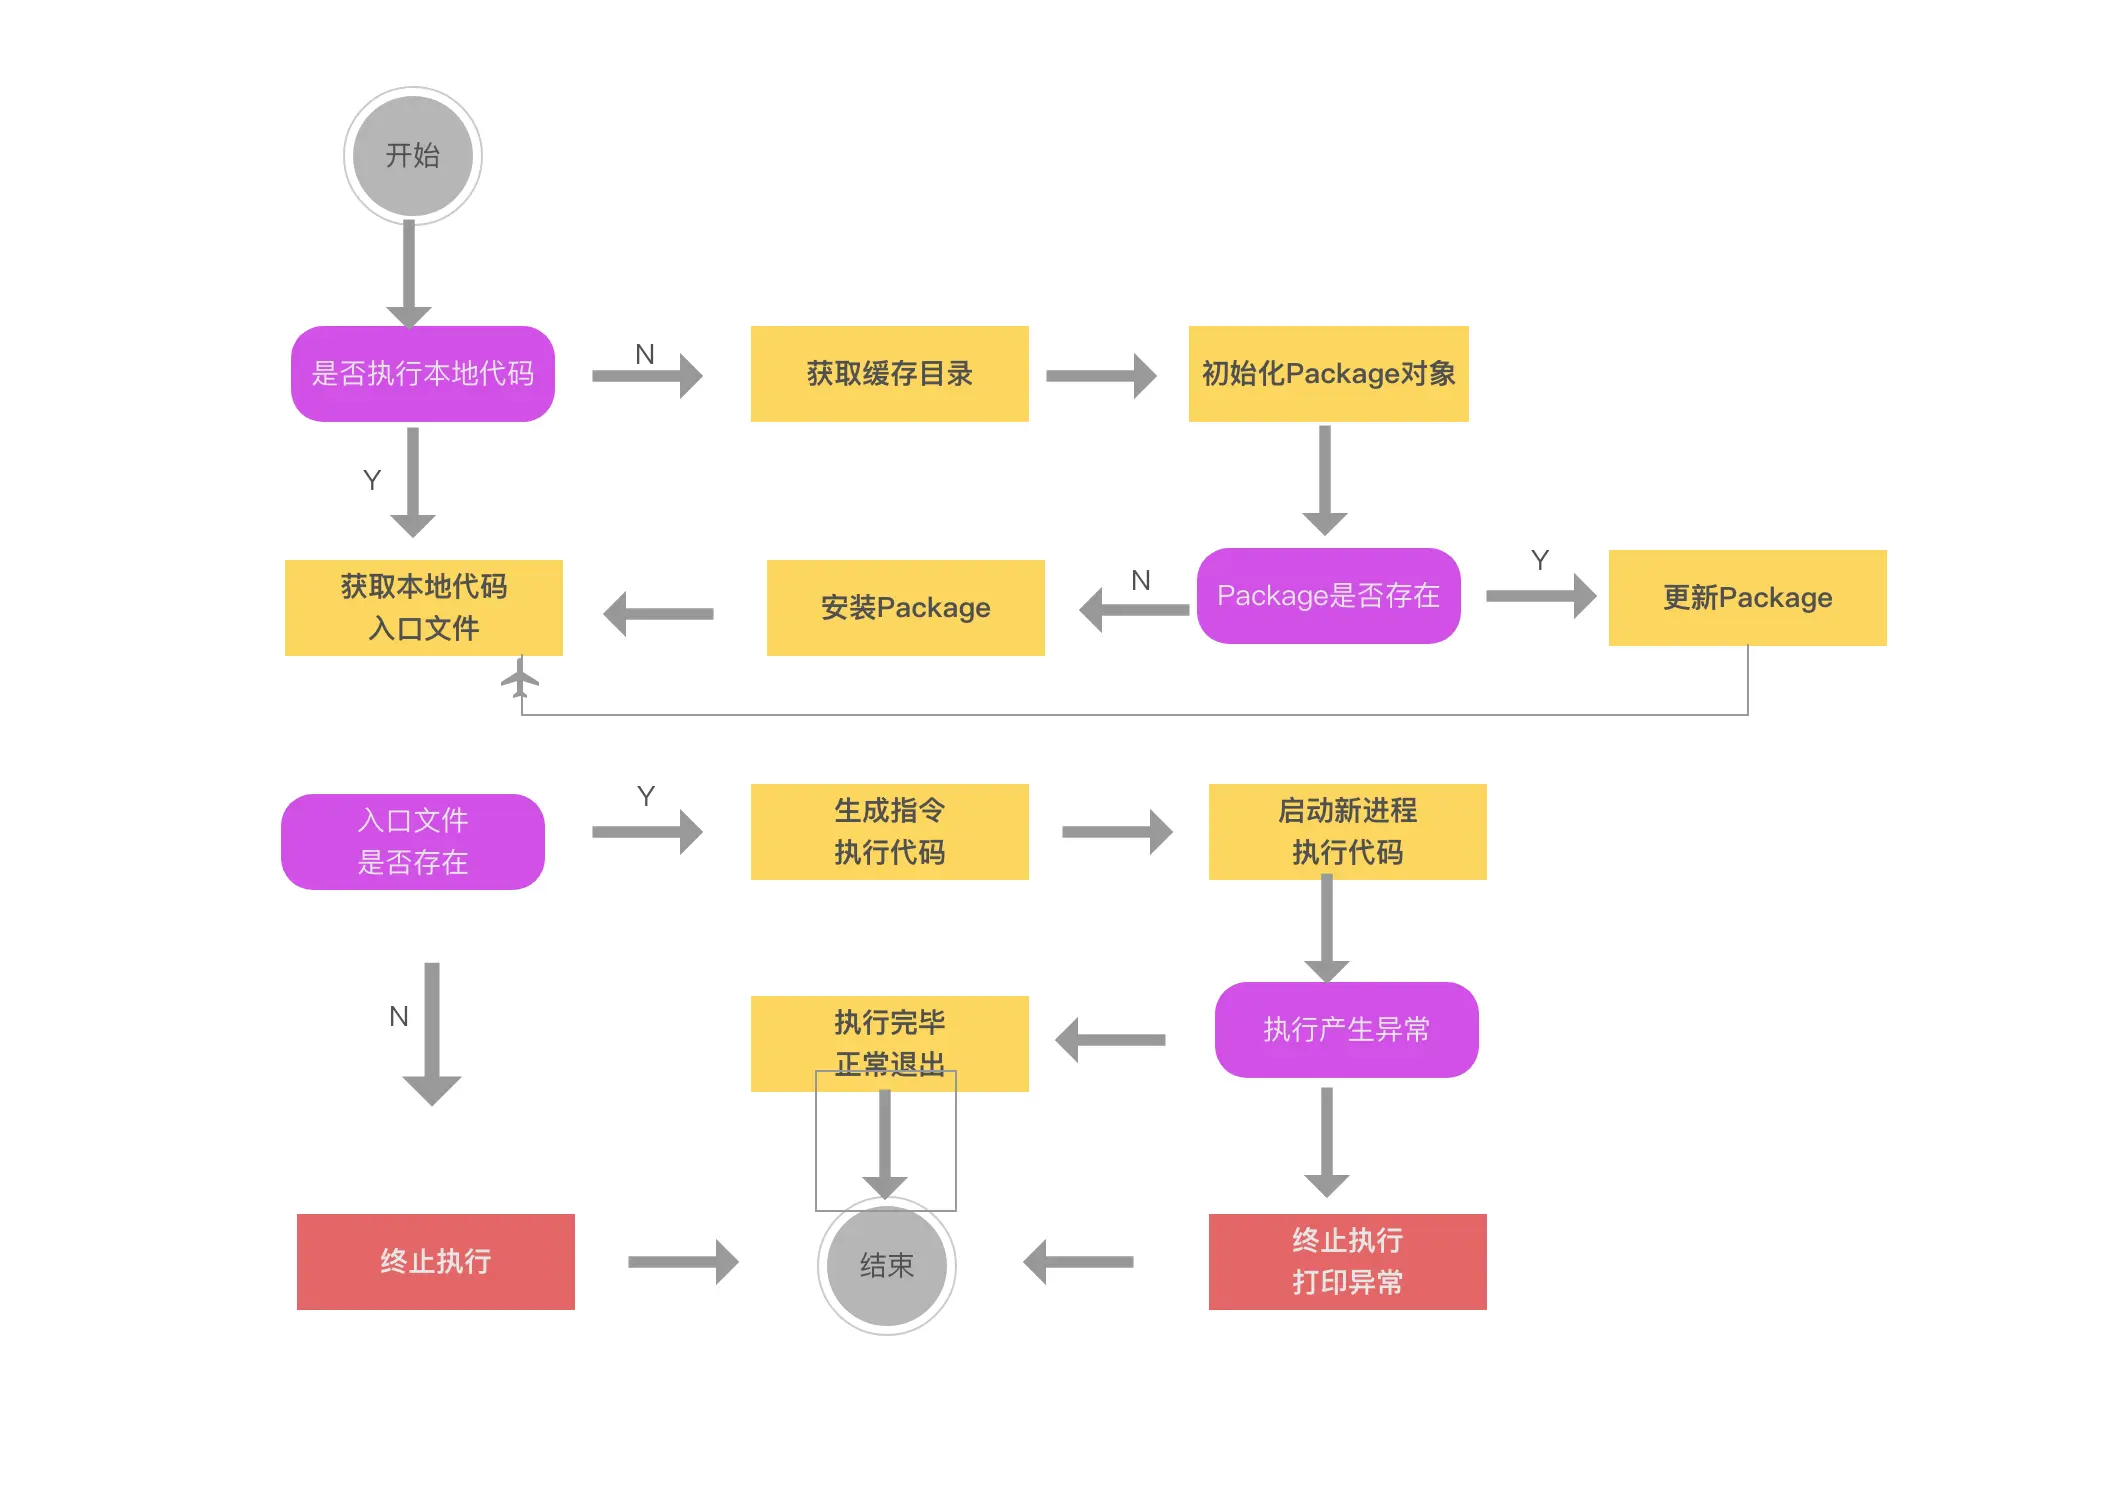
3-3 脚手架命令动态加载功能架构设计
上图架构初看有些难度,在代码编写之后再去回顾,会有更深理解。
本节简单讲述了两点:
require加载文件的用法:
require(‘/xxx/yyy/index.js’) ---- 加载绝对路径
require(‘./index.js’)----加载相对路径
require(‘fs’) ---- 加载内置模块
require(‘npmlog’) ---- 加载第三方包
node执行模块两种方式
node 执行文件: ** node core/cli/bin/index.js**
node -e ‘字符串’:node -e “require(./core/cli/bin/index.js)”
第四章 通用 npm 模块类 Package 封装
4-1 脚手架命令本地调试功能支持
(本节有代码编写)
通过前面画图了解,我们要实现的第一步是initCommand的动态命令加载,即3-3 章节所示图。targetPath
1 2 3 4 5 6 7 8 9 program. .option ('-tp, --targetPath <targetPath>' ,'是否指定本地调试文件路径' ,'' ) program.on ('option:targetPath' ,function ( process.env .CLI_TARGET_PATH = program.opts ().targetPath })
1 2 3 4 5 6 7 8 9 'use strict' ;function init (projectName,options,command ) { console .log ('init' ,projectName,command.opts ().force ,process.env .CLI_TARGET_PATH ) } module .exports = init;
本节需要注意的一点是如果commander版本低于7.0.0,那么 program.action()中传入的参数为两个。
另外,访问targetPath这个参数的时候,需要program.opts().targetPath访问。
4-2 动态执行库exec模块创建
(本节有代码编写)
core下新建包文件: lerna create @cloudscope-cli/exec core/
4-3 创建npm模块通用类Package
(本节有代码编写)
首先讲解了exec模块逻辑
targetPath -> modulePath
modulePath -> Package(npm模块)
Package.getRootFile(获取入口文件)
Package.update / Package.install
代码实现:
在model文件下创建新的模块Package:lerna create @cloudscope-cli/package
在core/exec/lib/index.js文件中引入:const Package = require(‘@cloudscope-cli/package’)
4-4 Package类的属性、方法定义及构造函数逻辑开发
(本节有代码编写)
本节主要有三处代码讲解
core/exec中创建一个Package对象
model/package中Package类的构造方法
utils/utils中添加isObject方法:判断一个属性是否为对象
1 2 3 4 5 6 7 8 9 10 11 12 13 14 15 16 17 18 19 20 21 22 23 24 25 26 27 28 29 30 31 32 33 34 35 'use strict' ;const Package = require ('@cloudscope-cli/package' )const log = require ('@cloudscope-cli/log' )const SETTINGS = { init : '@cloudscope-cli/init' } function exec ( let targetPath = process.env .CLI_TARGET_PATH const homePath = process.env .CLI_HOME_PATH let storeDir ='' ; let pkg; log.verbose ('targetPath' , targetPath); log.verbose ('homePath' , homePath); const cmdObj = arguments [arguments .length - 1 ]; const cmdName = cmdObj.name (); const packageName = SETTINGS [cmdName]; const packageVersion = 'latest' ; pkg = new Package ({ targetPath, storeDir, packageName, packageVersion }) console .log (pkg) } module .exports = exec;
1 2 3 4 5 6 7 8 9 10 11 12 13 14 15 16 17 18 19 20 21 22 23 24 25 26 27 28 29 30 31 32 33 34 35 'use strict' ;const { isObject } = require ('@liugezhou-cli-dev/utils' );class Package { constructor (options ){ if ( !options){ throw new Error ('Package类的options参数不能为空!' ) } if ( !isObject (options) ){ throw new Error ('Package类的options参数必须为对象!' ) } this .targetPath = options.targetPath this .storeDir = options.storeDir this .packageName = options.packageName this .packageVersion = options.packageVersion ; } exists ( install ( update ( getRootFilePath ( } module .exports = Package ;
1 2 3 4 5 6 7 8 9 'use strict' function isObject (obj ){ return Object .prototype toString .call (obj).slice (8 ,-1 ) === 'Object' } module .exports = { isObject }
4-5 Package类获取入口文件路径功能开发(pkg-dir应用+解决不同操作系统路径兼容问题)
思路:
获取package.json的所在目录–通过安装pkg-dir库
读取package.json
寻找main/lib
路径的兼容macOS/windows --新建包:utils/format-path,且新建路径兼容方法
核心代码为
1 2 3 4 5 6 7 8 9 10 11 12 13 14 15 ………… const dir = pkgDir (targetPath);if (dir) { const pkgFile = require (path.resolve (dir, 'package.json' )); if (pkgFile && pkgFile.main ) { return formatPath (path.resolve (dir, pkgFile.main )); } } return null ;…………
1
2
3
4
5
6
7
8
9
10
11
12
13
14
15
'use strict' ;const path = require ('path' )function formatPath (p ) { const sep = path.sep ; if (p && typeof p === 'string' ){ if (sep !=='/' ){ return p.replace (/\\/g ,'/' ) } } return p } module .exports = formatPath;
4-6 利用npminstall库安装npm模块
(本节有代码编写)
使用之前现在测试项目下使用之:测试代码 。
1
2
3
4
5
6
7
8
9
10
11
const npminstall = require ('npminstall' )const path = require ('path' )const userHome = require ('user-home' )npminstall ({ root : path.resolve (userHome,'.cli-test' ), storeDir : path.resolve (userHome,'.cli-test' ,'node_modules' ) , registry :'https://registry.npmjs.org' , pkgs :[ {name :'foo' ,version :'~1.0.0' } ] })
首先,我们的项目在开发过程中可能会有错误,有的需要去看执行栈,有的不需要,因此我们在core/cli/lib/index中的core方法中,catch语句中加入如下代码(debug模式下显示执行栈错误)
1
2
3
if (program.opts ().debug ){ console .log (e) }
2.在core/exec/lib/index.js文件中,我们修改代码如下(主要加入了如果不存在targetPath的逻辑梳理):
1
2
3
4
5
6
7
8
9
10
11
12
13
14
15
16
17
18
19
20
21
22
23
24
25
26
27
28
29
30
31
32
33
34
35
36
37
38
39
40
41
42
43
44
45
46
47
48
49
50
51
52
53
54
55
56
57
58
'use strict' ;const path = require ('path' ) const Package = require ('@cloudscope-cli/package' )const log = require ('@cloudscope-cli/log' )const SETTINGS = { init : '@imooc-cli/init' } const CATCH_DIR = 'dependencies' async function exec ( let targetPath = process.env .CLI_TARGET_PATH const homePath = process.env .CLI_HOME_PATH let storeDir ='' ; let pkg; log.verbose ('targetPath' , targetPath); log.verbose ('homePath' , homePath); const cmdObj = arguments [arguments .length - 1 ]; const cmdName = cmdObj.name (); const packageName = SETTINGS [cmdName]; const packageVersion = 'latest' ; if (!targetPath){ targetPath = path.resolve (homePath,CATCH_DIR ); storeDir = path.resolve (targetPath,'node_modules' ) log.verbose ('targetPath:' ,targetPath) log.verbose ('storeDir:' ,storeDir) pkg = new Package ({ targetPath, storeDir, packageName, packageVersion }); if (await pkg.exists ()){ log.verbose ('更新package' ) await pkg.update (); }else { await pkg.install (); } }else { pkg = new Package ({ targetPath, packageName, packageVersion }) const rootFile = pkg.getRootFilePath (); if (rootFile){ require (rootFile).apply (null ,arguments ); } } } module .exports = exec;
model/package包中文件主要加入了安装package这个方法,使用了npminstall这个库。
1 2 3 4 5 6 7 8 9 10 11 12 13 14 15 async install ( await this .prepare () return npminstall ({ root : this .targetPath , storeDir : this .storeDir , registry :getDefaultRegistry (), pkg :{ name :this .packageName , version :this .packageVersion } }) }
4-7 Package类判断模块是否存在方法开发
1
2
3
4
5
6
7
8
9
10
11
12
13
14
15
16
17
18
19
20
21
22
23
24
25
26
27
28
………… this .cacheFilePathPrefix = this .packageName .replace ('/' , '_' ) ………… get cacheFilePath () { return path.resolve (this .storeDir ,`_${this .cacheFilePathPrefix} @${this .packageVersion} @${this .packageName} ` ) } async prepare ( if (this .storeDir && !pathExists (this .storeDir )){ fse.mkdirpSync (this .storeDir ) } if (this .packageVersion === 'latest' ){ this .packageVersion = await getNpmLatestVersion (this .packageName ); } } async exists ( if (this .storeDir ){ await this .prepare () return pathExists (this .cacheFilePath ); }else { return pathExists (this .targetPath ); } }
4-8 Package类更新模块逻辑开发
(本节有代码编写)
1 2 3 4 5 6 7 8 9 10 11 12 13 14 15 16 17 18 19 20 21 22 23 24 25 26 27 28 29 30 31 ………… getSpecificCacheFilePath (packageVersion ){ return path.resolve (this .storeDir ,`_${this .cacheFilePathPrefix} @${packageVersion} @${this .packageName} ` ) } async update ( const latestPackageVersion = await getNpmLatestVersion (this .packageName ); const latestFilePath = this .getSpecificCacheFilePath (latestPackageVersion) if (!pathExists (latestFilePath)){ await npminstall ({ root :this .targetPath , storeDir :this .storeDir , registry :getDefaultRegistry (), pkgs :[{ name :this .packageName , version :latestPackageVersion } ] }) this .packageVersion = latestPackageVersion }else { this .packageVersion = latestPackageVersion } return latestFilePath; }
4-9 Package类获取缓存模块入口文件功能改造
(本节有代码编写)
1 2 3 4 5 6 7 8 9 10 11 12 13 14 15 16 17 18 19 20 21 22 getRootFilePath ( function _getRootFile (targetPath ) { const dir = pkgDir (targetPath); if (dir) { const pkgFile = require (path.resolve (dir, 'package.json' )); if (pkgFile && pkgFile.main ) { return formatPath (path.resolve (dir, pkgFile.main )); } } return null ; } if (this .storeDir ) { return _getRootFile (this .cacheFilePath ); } else { return _getRootFile (this .targetPath ); } }
ps:关于项目的代码以上就结束了,代码提交至:lesson04
第五章:预备知识:Node 多进程开发入门
5-1 进程的基本概念(讲解在操作系统中如何查看进程的嵌套关系)
官方文档中文版: http://nodejs.cn/api/child_process.html
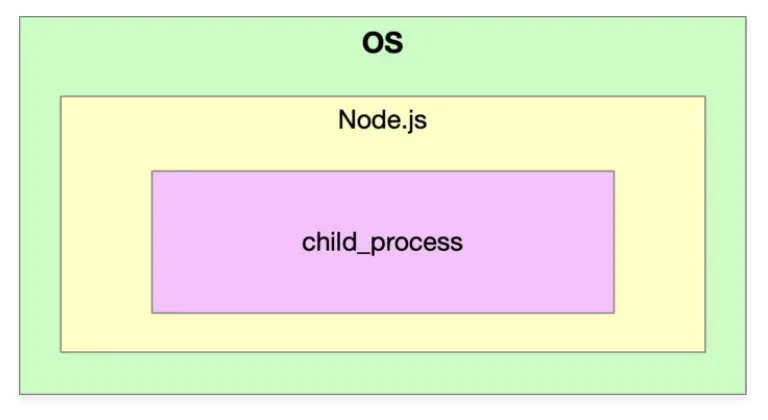
进程:进程(Process)是计算机中的程序关于某数据集合上的一次运行活动,是系统进行资源分配和调度的基本单元,是操作系统结构的基础。
第一,进程是一个实体。每一个进程都有它自己的地址空间。
第二,进程是一个“执行中的程序”,存在嵌套关系
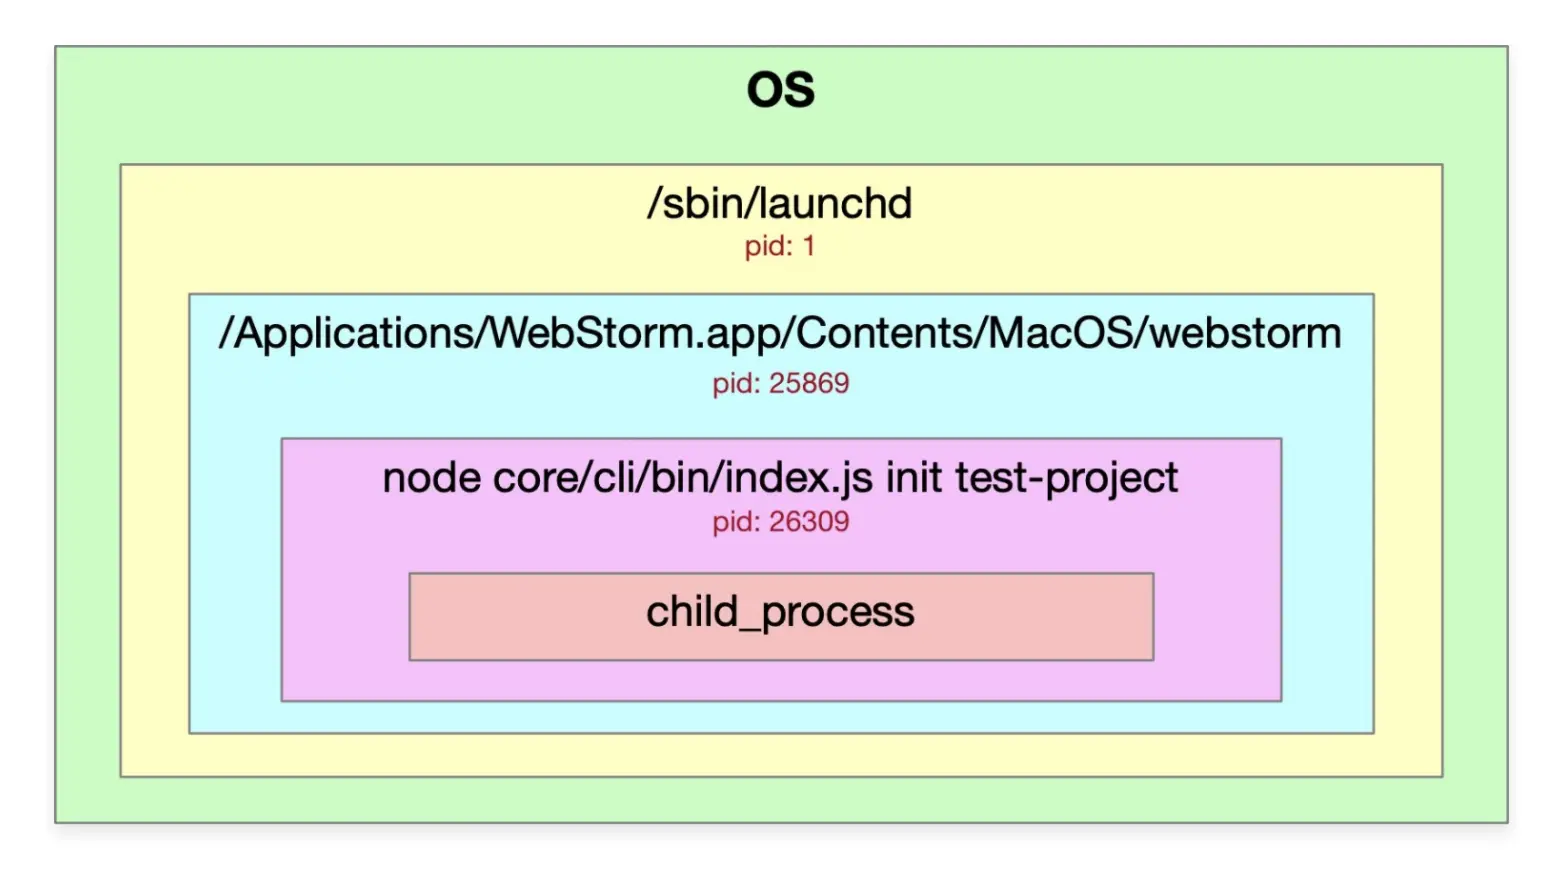
Node进程存在的感知:
UID是当前用户获取权限的ID
PID是当前进程ID
PPID是当前进程ID的父ID
使用webstorm调试一个node程序的图示如下:
5-2 child_process异步方法使用教程(exec&execFile)
异步用法
同步用法
execSync
execFileSync
spawnSync
1 2 3 4 5 6 7 8 9 10 11 12 13 14 const cp = require ('child_process' )cp.exec ('ls -al' ,function (err,stdout,stderr ){ console .log (err) console .log (stdout) console .log (stderr) }) cp.execFile ('ls' ,['-al' ],function (err,stdout,stderr ){ console .log (err) console .log (stdout) console .log (stderr) })
小结:exec和execFile在输出上看不出来区别。
exec主要用来执行一个shell命令,本质是execFile,只是参数不同,不支持传入arguments参数。
execFile只能执行一个文件,且加入一些命令,不能使用管道符。
5-3 child_process spawn用法以及与exec&execFile的区别
exec、execFile、fork底层都是使用的spawn。
1
2
3
4
5
6
7
8
9
10
11
12
13
14
15
const cp = require ('child_process' )const path = require ('path' )const child = cp.spawn (path.resolve (__dirname,'test.shell' ),['-al' ,'-bl' ],{ cwd :path.resolve ('..' ) }); child.stdout .on ('data' ,function (chunk ){ console .log ('stdout' ,chunk.toString ()) }) child.stderr .on ('data' ,function (chunk ){ console .log ('stderr' ,chunk.toString ()) })
spawn:耗时任务(比如 npm install): 不断打印日志
5-4 child_process fork用法及父子进程通信机制讲解
fork主要是使用node来执行我们的命令。
1 2 3 4 5 6 7 8 9 10 11 12 13 14 15 16 17 18 19 20 21 22 23 const cp = require ('child_process' )const path = require ('path' )const child = cp.fork (path.resolve (__dirname,'child.js' ))child.send ('hello child process!' ,()=> { }) console .log ('main pid:' ,process.pid )child.on ('message' ,msg => console .log (msg) child.disconnect () }) console .log ('child pid:' ,process.pid )process.on ('message' , (msg )=> { console .log (msg) }) process.send ('hello main process!' )
5-5 child_process同步方法使用教程
execSync
execFileSync
spawnSync
1
2
3
4
5
6
7
8
9
10
11
12
13
const cp = require ('child_process' )const ret = cp.execSync ('ls -al | grep index.js' )console .log (ret.toString ())const ret2 = cp.execFileSync ('ls' , ['-al' ])console .log (ret2.toString ())const ret3 = cp.spawnSync ('ls' ,['-al' ])console .log (ret3.stdout .toString ())
第六章 基于 Node 多进程构建高性能脚手架
6-1 通过脚手架命令Command类封装
(本节有代码编写)
在 model文件夹下安装Command包:lerna create @cloudscope-cli/command
在commands/init 的package.json中引入上面新创建的包command,继承它作为它的子类。
然后我们来到新建的command包的lib/index文件中,添加如下代码(同时删除core/cli/lib/index.js中关于checNodeVersion方法的代码):
1
2
3
4
5
6
7
8
9
10
11
12
13
14
15
16
17
18
19
20
21
22
23
24
25
26
27
28
29
30
31
32
33
34
35
36
'use strict' ;const semver = require ('semver' )const colors = require ('colors/safe' )const LOWEST_NODE_VERSION = '12.0.0' class Command { constructor (argv ){ this ._argv = argv let runner = new Promise ((resolve,reject )=> { let chain = Promise .resolve () chain = chain.then (()=> this .checkNodeVersion ()) chain.catch (e => console .log (e.message ) }) }) } checkNodeVersion ( const currentNodeVersion = process.version const lowestNodeVersion = LOWEST_NODE_VERSION if (semver.ltr (currentNodeVersion, lowestNodeVersion)) { throw new Error (colors.red (`cloudscope-cli 需要安装 v${lowestNodeVersion} 以上版本的node.js` )) } } init ( throw Error ('init必须实现' ) } exec ( throw Error ('exec必须实现' ) } } module .exports = Command ;
接着,我们来到commands/init/lib/index.js文件中,进行代码的改写:
1
2
3
4
5
6
7
8
9
10
11
12
13
14
15
'use strict' ;const Command = require ('@cloudscope-cli/command' )class InitCommand extends Command {} function init (argv ) { return new InitCommand (argv) } module .exports = initmodule .exports .InitCommand = InitCommand ;
这里的argv参数传递是从 exec/lib/index.js中的require传递过来的,因此参数传递修改
1
2
3
require (rootFile).apply (null ,arguments );require (rootFile).call (null ,Array .from (arguments ));
6-2 脚手架参数初始化方法开发
(本节有代码编写)
首先在command包中引入log包,用于chain的catch错误打印(上节代码已更新)
其次,对于class Comman需要对传入的参数argv进行一个判断,
如果为空需要抛出异常,这里需要注意抛出的异常在core/cli/lib/index.js中并没有捕获,需要在core/exec/lib/index.js中require的这个targetPath文件进行try catch捕获。
对argv这个参数进行是否对数组的判断。
对argv是否为空数组进行判断
1
2
3
4
5
6
7
8
9
if (!argv){ throw new Error ('argv参数不能为空' ) } if (!Array .isArray (argv)){ throw new Error ('argv参数必须为数组' ) } if (argv.length < 1 ){ throw new Error ('参数列表为空' ) }
在chain里面实现initArgs方法:主要用来进行参数的分解,将argv最后一个参数与之前的参数装到两个参数中去。
1 2 3 4 5 6 7 8 9 10 11 12 13 14 15 16 let chain = Promise .resolve () chain = chain.then (()=> this .checkNodeVersion ()) chain = chain.then (()=> this .initArgs ()) chain = chain.then (()=> this .init ()) chain = chain.then (()=> this .exec ()) chain.catch (e => log.error (e.message ) }) initArgs ( const len = this ._argv .length - 1 this ._cmd = this ._argv [len].opts () this ._argv = this ._argv .slice (0 ,len) }
chain中的init方法与exec均抛出异常,需要由子类去实现:即commands/init/lib/index.js.6-3 利用Node多进程动态执行命令(stdio的inherit属性讲解)
(本节有代码编写)
我们回到exec/lib/index.js中,其中之前的那行代码arguments ));
我们通过本周第五章的内容,已经知道了如何使用child_process下的同步或者异步方法进行子进程的执行,这里我有两种方法可以使用
1
2
3
4
5
6
7
8
9
10
11
12
13
14
15
16
17
18
19
20
21
22
const cp = require ('child_process' ) const child = cp.spawn ('node' ,['-e' ,code],{ cwd :process.cwd (), stdio :'inherit' }) child.on ('error' , e => log.error (e.message ); process.exit (1 ); }) child.on ('exit' , e => log.verbose ('命令执行成功' + e); process.exit (e); })
spawn方法中的参数stdio默认值为’pipe’管道,pipe使得主进程与子进程会产生通信通道,因此需要通过on这种方式去进行监听。
6-4 生成Node多进程动态执行代码
(本节有代码编写)
通过上一节的学习,我们通过代码const args = Array.from(arguments )require(rootFile).call(null,Array.from(arguments)); require(rootFile).call(null,Array.from(arguments));
1
2
3
4
5
6
7
8
9
10
const args = Array .from (arguments )const cmd = args[args.length - 1 ] const o = Object .create (null )Object .keys (cmd).forEach (key => if (cmd.hasOwnProperty (key) && !key.startsWith ('_' )&& key!=='parent' ){ o[key]=cmd[key] } }) args[args.length -1 ] = o const code = `require('${rootFile} ').call(null,${JSON .stringify(args)} )`
注:由于我使用的commander是7.0.0的,低于此版本传入的参数为两个,但7.0.0版本传入参数为3个,因此上面的代码,我这里直接写成(不知道后续是否还会有错误):
1
2
let args = Array .from (arguments ).splice (0 ,2 )const code = `require('${rootFile} ').call(null,${JSON .stringify(args)} )`
到这里,使用node多进程执行代码的功能就完成了。
6-5 windows操作系统spawn执行命令兼容
(本节有代码编写)
windows操作系统与macOS关于spawn的执行是不一样的,本节解决的就是windows操作系统下的兼容
1
2
3
4
5
6
function exec (command,args,options ){ const win32 = process.platform === 'win32' ; const cmd = win32 ? 'cmd' : command const cmdArgs = win32 ? ['/c' ].concat (command,args) : args; return require ('child_process' ).spawn (cmd, cmdArgs,options || {}) }
到以上为止,我们完成了动态命令的加载和执行。
第七章 加餐:Node 进阶: child_process 源码分析
7-1 Node多进程child_process库exec方法源码执行流程分析
疑问和收获:
exec和execFile到底有什么区别?
exec源码粗略分析点击查看【processon】
在未学习exec源码之前,我们先对上面的拓扑图进行一个简单的学习,看到exec内部的执行流程
我们在webstorm中打开一个项目
1 2 3 4 5 6 7 8 9 10 const cp = require ('child_process' )const path = require ('path' )cp.exec ('ls -al|grep node_modules ' ,function (err,stdout,stderr ){ console .log (err) console .log (stdout) console .log (stderr) })
第五行代码打断点,配置webstorm调试设置后,执行命令(我这里是liugezhou-test),进入到exec源码
1
2
3
4
5
6
function exec (command, options, callback ) { const opts = normalizeExecArgs (command, options, callback); return module .exports .execFile (opts.file , opts.options , opts.callback ); }
正如上面拓扑图画的那样,首先执行一个normalLizeExecArgs方法,然后调用execFile这个方法
1
2
3
4
5
6
7
8
9
10
11
12
13
14
15
16
17
18
19
20
21
22
23
24
25
26
27
28
29
30
31
32
33
34
35
36
37
38
39
40
41
function execFile (file ) { ……………… const child = spawn (file, args, { cwd : options.cwd , env : options.env , gid : options.gid , uid : options.uid , shell : options.shell , windowsHide : !!options.windowsHide , windowsVerbatimArguments : !!options.windowsVerbatimArguments }); ……………… function exithandler (code, signal ) { ……………… callback (ex, stdout, stderr); } function errorhandler (e ) { ……………… exithandler (); } if (child.stdout ) { ……………… } if (child.stderr ) { ……………… } child.addListener ('close' , exithandler); child.addListener ('error' , errorhandler); return child; }
上面代码的4行,我们看到调用了spawn方法。
1
2
3
4
5
6
7
8
9
10
11
12
13
14
15
16
17
18
19
20
21
22
function spawn (file, args, options ) { const opts = normalizeSpawnArguments (file, args, options); const child = new ChildProcess (); …………………… child.spawn ({ file : opts.file , args : opts.args , cwd : options.cwd , windowsHide : !!options.windowsHide , windowsVerbatimArguments : !!options.windowsVerbatimArguments , detached : !!options.detached , envPairs : opts.envPairs , stdio : options.stdio , uid : options.uid , gid : options.gid , serialization : options.serialization , }); return child; }
spawn方法的第2行如拓扑图所示,对参数执行了normalizeSpawnArguments方法,这里通过调试查看参数,发现,opts这个对象的file为 ‘bin/sh’,这里涉及到一个重要的知识点:
shell的使用
直接执行shell文件: /bin/sh test.shell
直接执行shell语句: /bin/sh -c “ls -al|grep node_modules”
spawn方法的第3行 const child = new ChildProcess
在spwan最后返回child后,我们再返回到execFile中,发现child.stdout与child.stderr方法的输出,以及回调f
上面就是对exec源码的略读过程。
7-2 高能:child_process库exec源码精度
上一节我们阅读了exec源码的第一遍,对答题流程有了认识,这节开始阅读第二遍,进行细节的解读。
首先进入到exec的normalizeExecArgs方法,逻辑简单。
1
2
3
4
5
6
7
8
9
10
11
12
13
14
15
16
17
function normalizeExecArgs (command, options, callback ) { if (typeof options === 'function' ) { callback = options; options = undefined ; } options = { ...options }; options.shell = typeof options.shell === 'string' ? options.shell : true ; return { file : command, options : options, callback : callback }; }
然后我们进入到execFile中,分析流程写入到下面代码之中:
1 2 3 4 5 6 7 8 9 10 11 12 13 14 15 16 17 18 19 20 21 22 23 24 25 26 27 28 29 30 31 32 33 34 35 36 37 38 39 40 41 42 43 44 45 46 47 48 49 50 51 52 53 54 55 56 57 58 59 60 61 function execFile (file ) { let args = []; let callback; let options; let pos = 1 ; if (pos < arguments .length && ArrayIsArray (arguments [pos])) { args = arguments [pos++]; } else if (pos < arguments .length && arguments [pos] == null ) { pos++; } if (pos < arguments .length && typeof arguments [pos] === 'object' ) { options = arguments [pos++]; } else if (pos < arguments .length && arguments [pos] == null ) { pos++; } if (pos < arguments .length && typeof arguments [pos] === 'function' ) { callback = arguments [pos++]; } if (!callback && pos < arguments .length && arguments [pos] != null ) { throw new ERR_INVALID_ARG_VALUE ('args' , arguments [pos]); } options = { encoding : 'utf8' , timeout : 0 , maxBuffer : MAX_BUFFER , killSignal : 'SIGTERM' , cwd : null , env : null , shell : false , ...options }; validateTimeout (options.timeout ); validateMaxBuffer (options.maxBuffer ); options.killSignal = sanitizeKillSignal (options.killSignal ); const child = spawn (file, args, { cwd : options.cwd , env : options.env , gid : options.gid , uid : options.uid , shell : options.shell , windowsHide : !!options.windowsHide , windowsVerbatimArguments : !!options.windowsVerbatimArguments }); ………………
上面代码走到51行后,进入spawn源码
1
2
3
4
5
6
7
8
9
10
11
12
13
14
15
16
17
18
19
20
21
22
23
24
25
26
27
function spawn (file, args, options ) { const opts = normalizeSpawnArguments (file, args, options); const child = new ChildProcess (); options = opts.options ; debug ('spawn' , opts.args , options); child.spawn ({ file : opts.file , args : opts.args , cwd : options.cwd , windowsHide : !!options.windowsHide , windowsVerbatimArguments : !!options.windowsVerbatimArguments , detached : !!options.detached , envPairs : opts.envPairs , stdio : options.stdio , uid : options.uid , gid : options.gid , serialization : options.serialization , }); return child; }
7-3 深度分析child_process库spawn底层实现
第一步是通过getValidStdio去生成pipe,创建一个管道实例:第一个是输入,第二个是输出,第三个是error(只是生成了管道,但是还没创建socket的通信)
第二步对spawn的一些参数进行处理:下面代码未贴
第三步通过this._handle.spawn 子进程被创建出来
第四步通过createSocket方法,将之前的pipe和子进程与socket绑定。
1
2
3
4
5
6
7
8
9
10
11
12
13
14
15
16
17
18
19
20
21
22
23
24
25
26
27
28
29
30
31
32
33
34
35
36
37
ChildProcess .prototype spawn = function (options ) {……………… stdio = getValidStdio (stdio, false ); ……………… const err = this ._handle .spawn (options); …………… for (i = 0 ; i < stdio.length ; i++) { ……………… if (stream.handle ) { stream.socket = createSocket (this .pid !== 0 ? stream.handle : null , i > 0 ); if (i > 0 && this .pid !== 0 ) { this ._closesNeeded ++; stream.socket .on ('close' , () => { maybeClose (this ); }); } } } ……………… return err; };
然后我们再返回到execFile中,接着往下走:
1
2
3
4
5
6
7
8
9
10
11
12
13
14
15
16
17
18
19
20
21
22
23
24
25
26
27
28
29
30
31
32
33
34
35
36
37
38
39
40
41
42
43
44
45
46
47
48
49
50
51
52
53
54
55
56
57
58
59
60
61
62
63
64
65
66
67
68
69
70
71
72
73
74
75
76
77
78
79
80
81
82
83
84
85
86
87
88
89
90
91
92
93
94
95
96
97
98
99
100
101
102
103
104
105
106
107
108
109
110
111
112
113
114
115
116
117
118
119
120
121
122
123
124
125
126
127
128
129
130
131
132
133
134
135
136
137
function execFile (file ) {……………… let encoding; const _stdout = []; const _stderr = []; if (options.encoding !== 'buffer' && Buffer .isEncoding (options.encoding )) { encoding = options.encoding ; } else { encoding = null ; } ……………… function exithandler (code, signal ) { if (exited) return ; exited = true ; if (timeoutId) { clearTimeout (timeoutId); timeoutId = null ; } if (!callback) return ; let stdout; let stderr; if (encoding || ( child.stdout && child.stdout .readableEncoding )) { stdout = _stdout.join ('' ); } else { stdout = Buffer .concat (_stdout); } if (encoding || ( child.stderr && child.stderr .readableEncoding )) { stderr = _stderr.join ('' ); } else { stderr = Buffer .concat (_stderr); } if (!ex && code === 0 && signal === null ) { callback (null , stdout, stderr); return ; } if (args.length !== 0 ) cmd += ` ${args.join(' ' )} ` ; if (!ex) { ex = new Error ('Command failed: ' + cmd + '\n' + stderr); ex.killed = child.killed || killed; ex.code = code < 0 ? getSystemErrorName (code) : code; ex.signal = signal; } ex.cmd = cmd; callback (ex, stdout, stderr); } function errorhandler (e ) { ex = e; if (child.stdout ) child.stdout .destroy (); if (child.stderr ) child.stderr .destroy (); exithandler (); } ……………… if (options.timeout > 0 ) { ……………… } if (child.stdout ) { if (encoding) child.stdout .setEncoding (encoding); child.stdout .on ('data' , function onChildStdout (chunk ) { const encoding = child.stdout .readableEncoding ; const length = encoding ? Buffer .byteLength (chunk, encoding) : chunk.length ; stdoutLen += length; if (stdoutLen > options.maxBuffer ) { const truncatedLen = options.maxBuffer - (stdoutLen - length); _stdout.push (chunk.slice (0 , truncatedLen)); ex = new ERR_CHILD_PROCESS_STDIO_MAXBUFFER ('stdout' ); kill (); } else { _stdout.push (chunk); } }); } if (child.stderr ) { if (encoding) child.stderr .setEncoding (encoding); child.stderr .on ('data' , function onChildStderr (chunk ) { const encoding = child.stderr .readableEncoding ; const length = encoding ? Buffer .byteLength (chunk, encoding) : chunk.length ; stderrLen += length; if (stderrLen > options.maxBuffer ) { const truncatedLen = options.maxBuffer - (stderrLen - length); _stderr.push (chunk.slice (0 , truncatedLen)); ex = new ERR_CHILD_PROCESS_STDIO_MAXBUFFER ('stderr' ); kill (); } else { _stderr.push (chunk); } }); } child.addListener ('close' , exithandler); child.addListener ('error' , errorhandler); return child; }
7-4 child_process事件应用方法详解
本节我们进入到child_process源码的第三轮,彻底搞懂process的回调流程,也是child_process中最复杂的部分。同样,我们通过processOn图对流程进行梳理一遍:
点击查看【processon】
在分析了上面流程后,我们先写一些测试代码以理解上面的流程。
1
2
3
4
5
6
7
8
9
10
11
12
13
14
15
16
17
18
19
20
21
22
23
24
25
26
const cp = require ('child_process' )const path = require ('path' )const child = cp.exec ('ls -al|grep node_modules' ,function (err,stdout,stderr ){ console .log ('callback--------start' ) console .log (stdout) console .log ('callback--------end' ) }) child.stdout .on ('data' ,(chunk )=> { console .log ('stdout data:' ,chunk) }) child.stderr .on ('data' ,(chunk )=> { console .log ('stderr data:' ,chunk) }) child.stderr .on ('close' ,()=> { console .log ('stderr close' ) }) child.on ('exit' ,(exitCode )=> { console .log ('exit:' ,exitCode) }) child.on ('close' ,()=> { console .log ('close!' ) })
7-5 高难度:深度解析child_process库spawn方法回调原理
这一章完全听的懵逼了。略过。。。。。。。
7-6 child_process库fork执行流程分析
略。。。。。。。
7-7 精化:Node多进程源码总结
exec/execFile/spawn/fork的区别
exec: 原理是调用/bin/sh -c 执行我们传入的shell脚本,底层调用略execFile
execFile:原理是直接执行我们传入的file和args,底层调用spawn创建和执行子进程,并建立略回调,一次性将所有的stdout和stderr结果返回
spawn:原理是调用略internal/child_process,实例化略ChildProcess子进程对象,再调用child.spawn创建子进程并执行命令,底层是调用了child.)handle.spawn执行process_wrap中的spwan方法,执行过程是异步的,执行完毕后再通过PIPE进行单向数据通信,通信结束后子进程发起onexit回调,同时Socket会执行close回调。
fork:原理是通过spawn创建子进程和执行命令,采用node执行命令,通过setupchannel创建IPC用于子进程和父进程之间的双向通信。
data/error/exit/close回调的区别
data:用于主进程读取数据过程中通过onStreamRead发起的回调
error: 命令执行失败后发起的回调
exit: 子进程关闭完成后发起的回调
close:子进程所有Socket通信端口全部关闭后发起的回调
stdout close/stderr close:特定的PIPE读取完成后调用onReadableStreamEnd关闭Socket时发起的回调。